s |
focus search bar ( enter to select, ▲ / ▼ to change selection) |
g c |
go to cluster |
g e |
go to edctools |
g f |
go to facility |
g g |
go to guidelines |
g t |
go to training |
h |
toggle this help ( esc also exits) |
iPOP-UP training: hands-on
Date: 29/09/2026
Trainers: Julien Rey, Magali Hennion, Emeline Bruyère
Presentation
The slides of the presentation can be downloaded here.
Table of content
- Connect to the cluster
- Get information about the cluster
- Submit job on the cluster
- Useful sbatch options 1/2
- Use software on the cluster: Modules
- Handle and monitor jobs
- Optional interlude: Viewing sequencing data in IGV
- Useful sbatch options 2/2
- Parallelization
- Complex workflows
- At the end of the day
- Useful resources
- Thanks
Connect to the cluster
There are several ways to connect to the cluster and use it. Choose the one that works best for you (web interface? local terminal? …).
1. via Open Ondemand
In order to make easier the work on the cluster, an Open OnDemand single point of access has been implemented. This way, you can access the cluster, modify your files, run your scripts, see your results, etc. in a simple web browser.
- Open a web browser and go to https://ondemand.rpbs.univ-paris-diderot.fr.
- Enter your cluster username and password and log in.
Now you can
- Browse and modify your files using the “Files” menu. You should have access to the
trainingproject. - Follow your jobs using the “Jobs” menu
- Launch a terminal to do all the exercises of this training using “Clusters/RPBS Shell Access”
- Launch RStudio, VS Code or Jupyter Lab for more advance analyses using the “Interactive Apps” menu
- Launch Virtual Desktop using the “Interactive Apps” menu to use graphical sotfware such as IGV
2. via JupyterHub interface (might be deprecated in the future)
- Open a web browser and go to https://jupyterhub.rpbs.univ-paris-diderot.fr.
- Enter your cluster username and password and sign in.
- Select your project (here: training), the resources you need (default resources are sufficient unless you want to run calculations within Jupyter Notebooks or RStudio), and press
Start.
The launcher allows you to start a Terminal that can be used for the rest of this course.
3. via SSH
Open your local terminal and type
ssh -o PubkeyAuthentication=no username@ipop-up.rpbs.univ-paris-diderot.fr
You won’t see anything when you type your password, this is normal, don’t panic!
Once connected to the cluster, use this terminal for the rest of this course.
Optional: use a file explorer
In you don’t use Open OnDemand or JupyterHub, you can use the file manager from GNOME to navigate easily on iPOP-UP file server.
- Open the file manager
Fichiers. - Click on
Autres emplacementson the side bar. - In the bar
Connexion à un serveur, typesftp://ipop-up.rpbs.univ-paris-diderot.fr/and press the enter key. - Enter your cluster login and password.
This way, you can modify your files directly using any local text editor.
Set the default project account
The first time you use the cluster, it is necessary to define your default project account.
To do so, run the following command in the terminal:
set_project YourProjectName
If you don’t do it, your jobs will quickly be blocked forever in the queue with the AssocGrpCPUMinutesLimit reason.
An alternative in to add the account in all your sbatch scripts (see below) using
#SBATCH --account=training
Warm-up
Now that you’re connected to the cluster via the interface of your choice, let’s explore the cluster’s file system architecture.
Using a terminal, answer this question: Where are you on the cluster? (hint: use the following command)
pwd
Then explore the /shared folder.
tree -L 1 /shared
or
ls /shared
/shared/banks folder contains commonly used data and resources. Explore it by yourself with commands like ls or cd.
Can you see the first 10 lines of the mm10.fa file? (mm10.fa = mouse genomic sequence version 10)
There is a training project accessible to you, navigate to this folder and list what is inside.
cd /shared/projects/training
ls
Then go to one of your projects and create a folder named 20260929_training. This is where you will do all the exercices. If you don’t have a project, you can create a folder named YourName in the training folder and work there.
Get information about the cluster
In a terminal, try the following command.
sinfo
Slurm sinfo command allows you to view the state and configuration of the cluster partitions and compute nodes.
Can you see how many partitions are on this cluster ? (→ Answer: 6, “rpbs”, “ipop-up”, “cmpli” …)
iPOP-UP gives you access to the ipop-up partition. Let’s restrict the sinfo command to this partition (-p attribute).
How many nodes are there in total? And what are the 2 types of nodes ? (→ Answer: 19, “cpu-node” and “gpu-node”)
sinfo -p ipop-up
You can even check which compute nodes are available and which one are completely allocated (-N attribute).
How many nodes are available ?
sinfo -p ipop-up -N
Nodes can be in one of the following states : completely available (idle or I), partially available (mix), allocated (alloc or A), drained or down.
Submit job on the cluster
Slurm sbatch command allows you to send an executable file to be ran on a computation node of the cluster.
Exercise 1: my first sbatch script
Starting from 01_02_flatter.sh, make a script named flatter.sh printing “What a nice training !”
Then run the script:
sbatch flatter.sh
The output that should have appeared on your screen has been diverted to slurm-xxxxx.out but this name can be changed using SBATCH options.

Exercise 2: my first SBATCH option
Modify flatter.sh to add this line:
#SBATCH -o flatter.out
then run it. Notice anything different?
Exercise 3: hostname
Using the previous exercise as an example, create a new script named hostname.sh.
When submitted with sbatch, your script must run the hostname command and the output file must be named hostname.out.
Run it. What is the output? How does it differ from typing hostname directly in the terminal and why?
Useful sbatch options 1/2
| Options | Flag | Function |
|---|---|---|
| −−partition | -p | partition to run the job (mandatory) |
| −−job-name | -J | give a job a name |
| −−output | -o | output file name |
| −−error | -e | error file name |
| −−chdir | -D | set the working directory before running |
| −−time | -t | limit the total run time (default : no limit) |
| −−mem | memory that your job will have access to (per node) |
To find out more, the Slurm manual man sbatch or https://slurm.schedmd.com/sbatch.html.
Use software on the cluster: Modules
A lot of tools are installed on the cluster. To list them, use one of the following commands.
module available
module avail
module av
You can limit the search for a specific tool, for example look for the different versions of multiqc on the cluster using module av multiqc.

To load a tool
module load tool/1.3
module load tool1 tool2 tool3
To list the modules loaded
module list
To remove all loaded modules
module purge
Handle and monitor jobs
Exercise 4: follow your jobs
The sleep command : do nothing (delay) for the set number of seconds.
Restart from 03_04_hostname_sleep.sh and launch a simple job that will launch sleep 600.
squeue
On your terminal, type
squeue
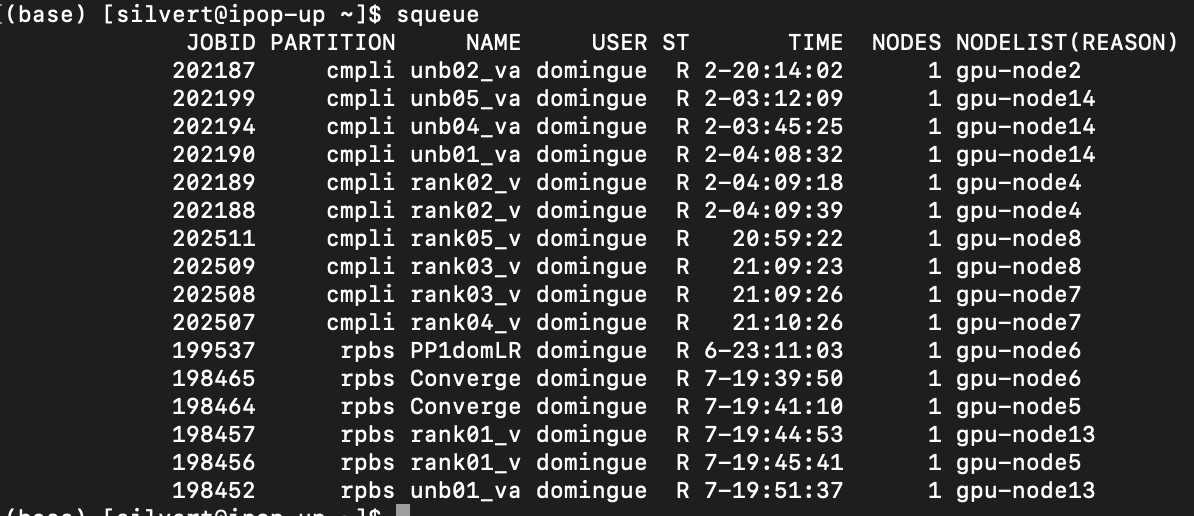
ST Status of the job.
R = Running
PD = Pending
To see only iPOP-UP jobs
squeue -p ipop-up
To see only the jobs of untel
squeue -u untel
To see only your jobs
squeue --me
scancel
To cancel a job which you started, use the scancel command followed by the jobID (Number given by SLURM, visible in squeue)
scancel jobID
You can stop the previous sleep job with this command.
sacct
Re-run sleep.sh and type
sacct

You can pass the option --format to list the information that you want to display, including memory usage, time of running,…
For instance
sacct --format=JobID,JobName,Start,Elapsed,CPUTime,NCPUS,NodeList,MaxRSS,ReqMeM,State
To see every options, run sacct --helpformat
Job efficiency : seff
After the run, the seff command allows you to access information about the efficiency of a job.
seff <jobid>

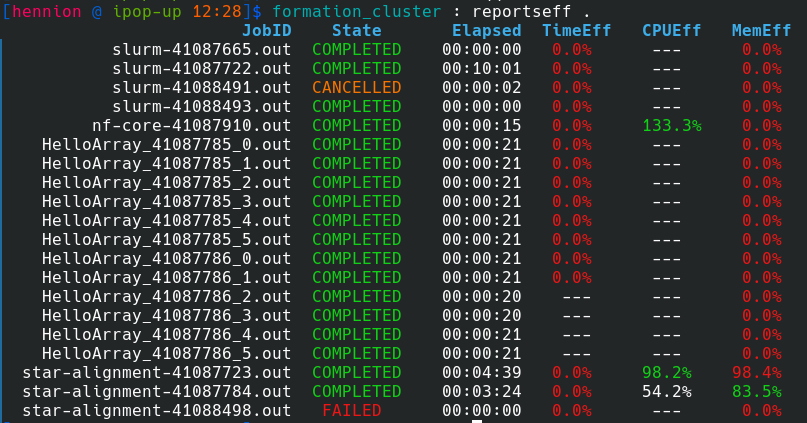
Job efficiency : reportseff
You can also use the reportseff module to get more information. The options are the same as for the sacct command.
module load reportseff
reportseff <jobid>

Exercise 5 : A practical example - Alignment
Run an alignment using STAR version 2.7.5a starting from 05_06_star_hg.sh.
- The FASTQ files to align are in
/shared/projects/training/test_fastq. - You need an index folder for STAR (version 2.7.5a) for the human hg38 genome, look for it in the banks.
- You have to increase the RAM to 25G.
You have an error?
Look at the error file to understand what went wrong and restart after correcting your script.
After the run
Check the resource that was used using seff or reportseff.
Generate BAM index
To visualise a BAM file on IGV, you need to build its index. To do so, you can use samtools. The command to use is
samtools index BAMFILE
You can write a small sbatch script to do so.
Optional interlude: Viewing sequencing data in IGV
In OnDemand interface, you can start a virtual desktop that allows you to run resource-intensive graphical tools such as IGV.
To do so, go to the Apps menu and click on Virtual Desktop.
Select your project (training for this course), the partition, the ressources you need (2 CPUs, 8 Go for our example), and the duration of your session. Then click on Launch. After few seconds your virtual desktop will be running and you can connect to it clicking on Launch Virtual Desktop.
Now you see a (simple) desktop, where you can start a terminal and type:
module load igv/2.19.7
igv
IGV should start. Select you genome of interest (hg38 in our example) and load the BAM file resulted from STAR alignment using File/Load from file....
Then you can navigate to chr22, for instance to BCR gene to see your reads aligned on the genome.
Useful sbatch options 2/2
| Options | Default | Function |
|---|---|---|
| −−nodes | 1 | Number of nodes required (or min-max) |
| −−nodelist | Select one or several nodes | |
| −−ntasks-per-node | 1 | Number of tasks invoked on each node |
| −−mem | 2GB | Memory required per node |
| −−cpus-per-task | 1 | Number of CPUs allocated to each task |
| −−mem-per-cpu | 2GB | Memory required per allocated CPU |
| −−array | Submit multiple jobs to be executed with identical parameters |
Parallelization
Multi-threading
Some tools allow multi-threading, i.e. the use of several CPUs to accelerate one task. It is the case of STAR with the --runThreadN option.
Exercise 6: Alignment, parallel
Modify the previous sbatch file to use 4 threads to align the FASTQ files on the reference. Run and check time and memory usage.
Use Slurm variables
The Slurm controller will set some variables in the environment of the batch script. They can be very useful. For instance, you can improve the previous script using $SLURM_CPUS_PER_TASK.
The full list of variables is visible here.
Some useful ones:
- $SLURM_CPUS_PER_TASK
- $SLURM_JOB_ID
- $SLURM_JOB_ACCOUNT
- $SLURM_JOB_NAME
- $SLURM_JOB_PARTITION
Of note, Bash shell variables can also be used in the sbatch script:
- $USER
- $HOME
- $HOSTNAME
- $PWD
- $PATH
Job arrays
Job arrays allow to start the same job a lot of times (same executable, same resources) on different files for example. If you add the following line to your script, the job will be launch 6 times (at the same time), the variable $SLURM_ARRAY_TASK_ID taking the value 0 to 5.
#SBATCH --array=0-5
Exercice 7 : Job array
Starting from 07_08_array_example.sh, make a simple script launching 6 jobs in parallel.
Exercice 8 : fair resource sharing
It is possible to limit the number of jobs running at the same time using %max_running_jobs in #SBATCH --array option.
Modify your script to run only 2 jobs at the time.
You will see using squeue command that some of the tasks are pending until the others are over.

Job arrays examples
Take all files matching a pattern in a directory
Example:
#SBATCH --array=0-7   # if 8 files to proccess
FQ=(*fastq.gz)  #Create a bash array
echo ${FQ[@]}   #Echos array contents
INPUT=$(basename -s .fastq.gz "${FQ[$SLURM_ARRAY_TASK_ID]}") #Each elements of the array are indexed (from 0 to n-1) for slurm
echo $INPUT     #Echos simplified names of the fastq files
List or find files to process
If for any reason you can’t use bash array, you can alternatively use ls or find to identify the files to process and get the nth with sed (or awk).
#SBATCH --array=1-4   # If 4 files, as sed index start at 1
INPUT=$(ls $PATH2/*.fq.gz | sed -n ${SLURM_ARRAY_TASK_ID}p)
echo $INPUT
Job Array Common Mistakes
- The index of bash arrays starts at 0
- Don’t forget to have different output files for each task of the array. It is the same for log names. You can use
%aor%Jin the names. For example:#SBATCH --output=%x-%J.out
| Variable | Signification | Exemple |
|---|---|---|
%j |
Job ID | 51400, 51401, 51402 |
%J |
Array ID + Array Task ID | 51400_0, 51400_1, 51400_2 |
%A |
Array ID | 51400 |
%a |
Array Task ID | 0, 1, 2 |
%x |
Job name | mon_job |
- Do not overload the cluster! Please use
%50(for example) at the end of your indexes to limit the number of tasks (here to 50) running at the same time. The 51st will start as soon as one finishes! - The RAM defined using
#SBATCH --mem=25Gis for each task
Complex workflows
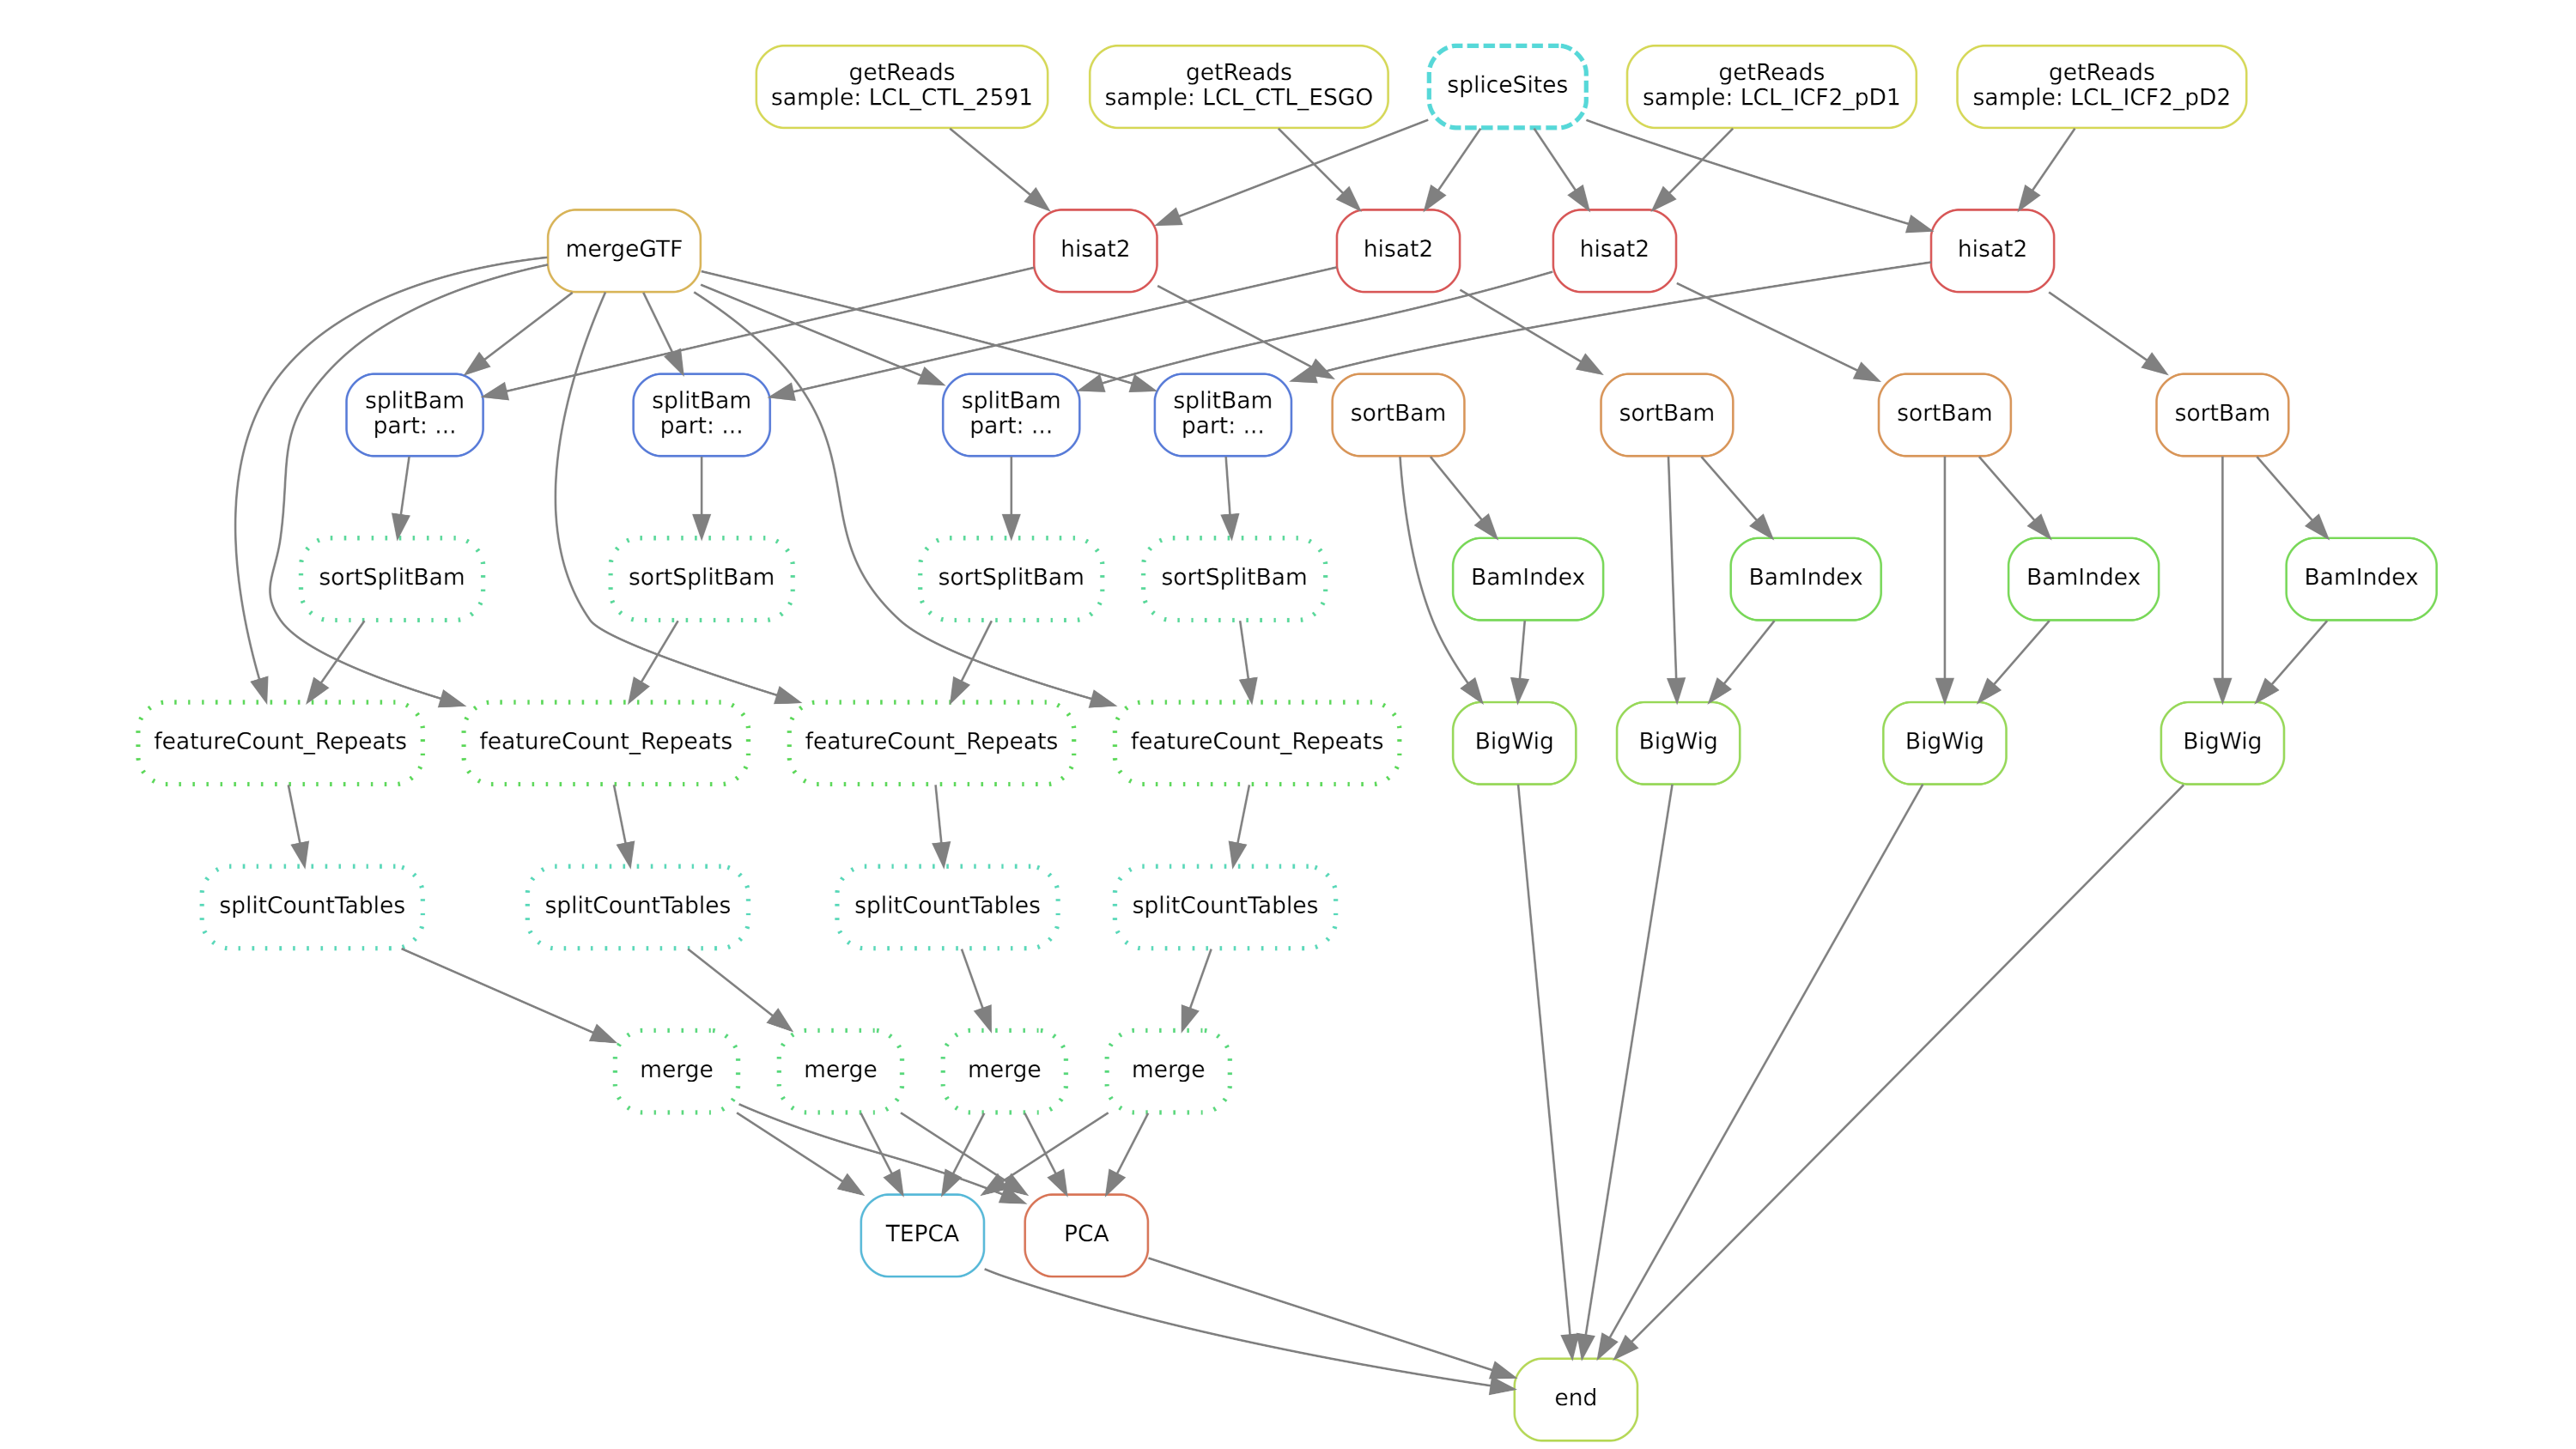
Use workflow managers such as Snakemake or Nextflow.
nf-core workflows can be used directly on the cluster.
Exercice 9: nf-core workflows
Starting from 09_nf-core_v2.sh, write a script running the demo workflow on the FASTQ files from exercice 5.
Some help can be found on the nf-core demo pipeline page as well as here. You have to
- use
ipop_upprofile - create a sample sheet following the format described in nf-core demo pipeline page and use it as input
- give a name to the output directory
Look at the results of the workfow.
Check the resource usage in pipeline_info/execution_report_xxx.html.
Exercice 10: nf-core workflows, adjust resources
You can see in the execution report or using sacct that the default memory resources defined by nf-core are too high for our little dataset. The resources allocated to the different steps can be modified (increased or decreased) in a dedicated configuration file. See the documentation.
For instance : demo.config
process {
    withName: 'NFCORE_DEMO:DEMO:SEQTK_TRIM' {
        memory = 1.GB
    }
    withName: 'NFCORE_DEMO:DEMO:FASTQC' {
        memory = 2.GB
    }
}
Then this configuration file can be given to nextflow command line using the option -c demo.config.
Create a configuration file adjusting the resources to the real needs, and modify your previous script to use it. Rerun the workflow. Check the execution report.
At the end of the day
You can check all the slurm outputs from a folder using reportseff.
Useful resources
-
To find out more, read the SLURM manual:
man sbatchor https://slurm.schedmd.com/sbatch.html -
Ask for help or signal problems on the cluster: https://discourse.rpbs.univ-paris-diderot.fr/
-
Introductory tutorial to the iPOP-U cluster: https://ipop.u-paris.fr/documentation-du-cluster-ipop-uprpbs/
-
iPOP-UP cluster documentation: https://ipop-up.docs.rpbs.univ-paris-diderot.fr/documentation/
-
BiBs practical guide: https://parisepigenetics.github.io/bibs/cluster/ipopup
-
IFB community support: https://community.france-bioinformatique.fr/
-
Nf-core documentation and tutorials: https://nf-co.re/docs/
-
To know more about iPOP-UP: https://ipop.u-paris.fr/
Thanks
- iPOP-UP’s technical and steering committees




|
BiBs
2026 parisepigenetics
https://github.com/parisepigenetics/bibs |
| programming pages theme v0.5.22 (https://github.com/pixeldroid/programming-pages) |