s |
focus search bar ( enter to select, ▲ / ▼ to change selection) |
g c |
go to cluster |
g e |
go to edctools |
g f |
go to facility |
g g |
go to guidelines |
g t |
go to training |
h |
toggle this help ( esc also exits) |

RNA-seq analysis using RASflow_EDC
Detailed tutorial
Maintained by Magali Hennion.
Last update : 17/01/2024. RASflow_EDC v1.3.
Implemented by BiBs-EDC, this workflow for RNA-seq data analysis is based on RASflow which was originally published by X. Zhang. It has been modified to run effectively on both IFB and iPOP-UP clusters and to fit our specific needs. Moreover, several tools and features were added, including a comprehensive report, as well as the possibility to incorporate the repeats in the analysis. If you encounter troubles or need additional tools or features, you can create an issue on the GitHub repository, email directly BiBs, or pass by the 366b room.
Table of content
- Your analysis in a nutshell
- Before starting : create an account and a project on your favorite cluster
- RASflow_EDC installation and description
- Adapt to your cluster
- Quick start with the test dataset
- Transfer your data
- Preparing the run
- Running your analysis step by step
- FASTQ quality control (eventually after SRA data retrieval)
- FastQC results
- Trimming
- Mapping on the whole genome or on transcriptome
- Mapping and counting
- Repeats analysis
- Transcriptome quantification
- Differential expression analysis and visualization
- Differential expression analysis from external count tables
- Start the workflow
- Description of the log files
- Workflow results
- Resources
- Extra help!
Your analysis in a nutshell
- Get an account on a cluster and create a project
- Clone RASflow_EDC repository
- Adapt to your cluster
- Transfer your data to the cluster
- Modify
metadata.tsvandconfig_main.yaml - Run the workflow typing
sbatch Workflow.sh - Look at the results
Here is a simplified scheme of the workflow. The main steps are indicated in the blue boxes. RASflow_EDC will allow you to choose which steps you want to execute for your project. In the green circles are the input files you have to give for the different steps.
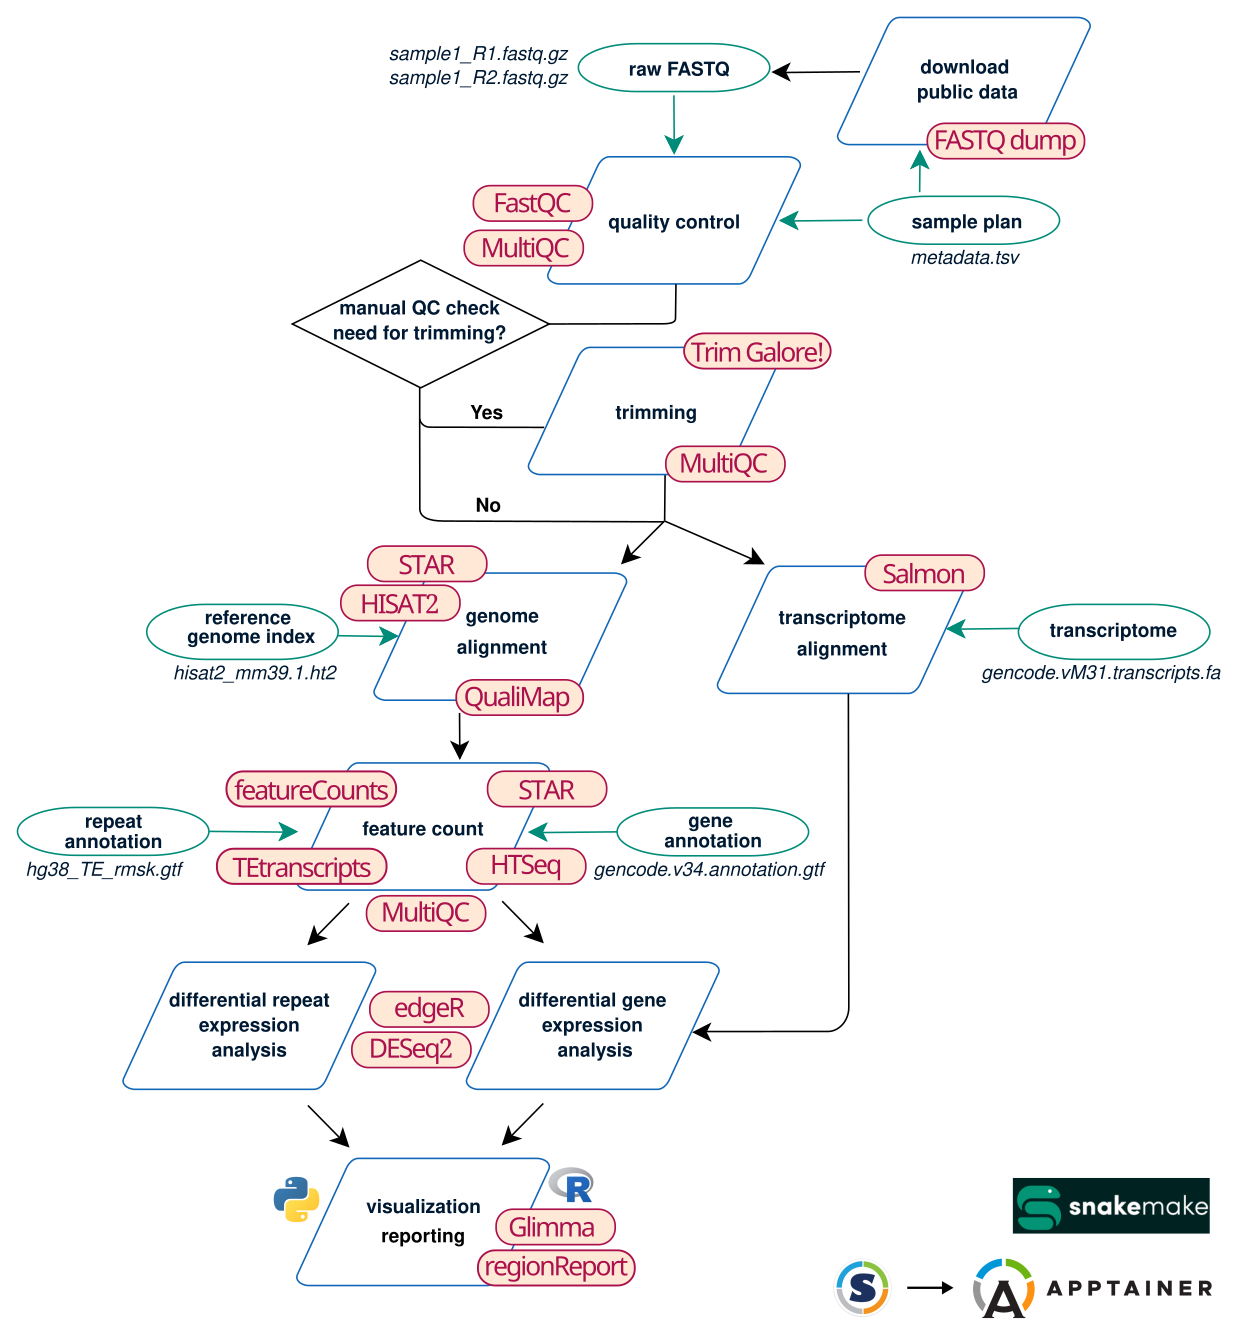
![]()
Before starting : create an account and a project on your favorite cluster
Please find instructions using the links below
RASflow_EDC installation and description
In order to install RASflow_EDC, you have to clone the RASflow_EDC GitHub repository to your cluster project.
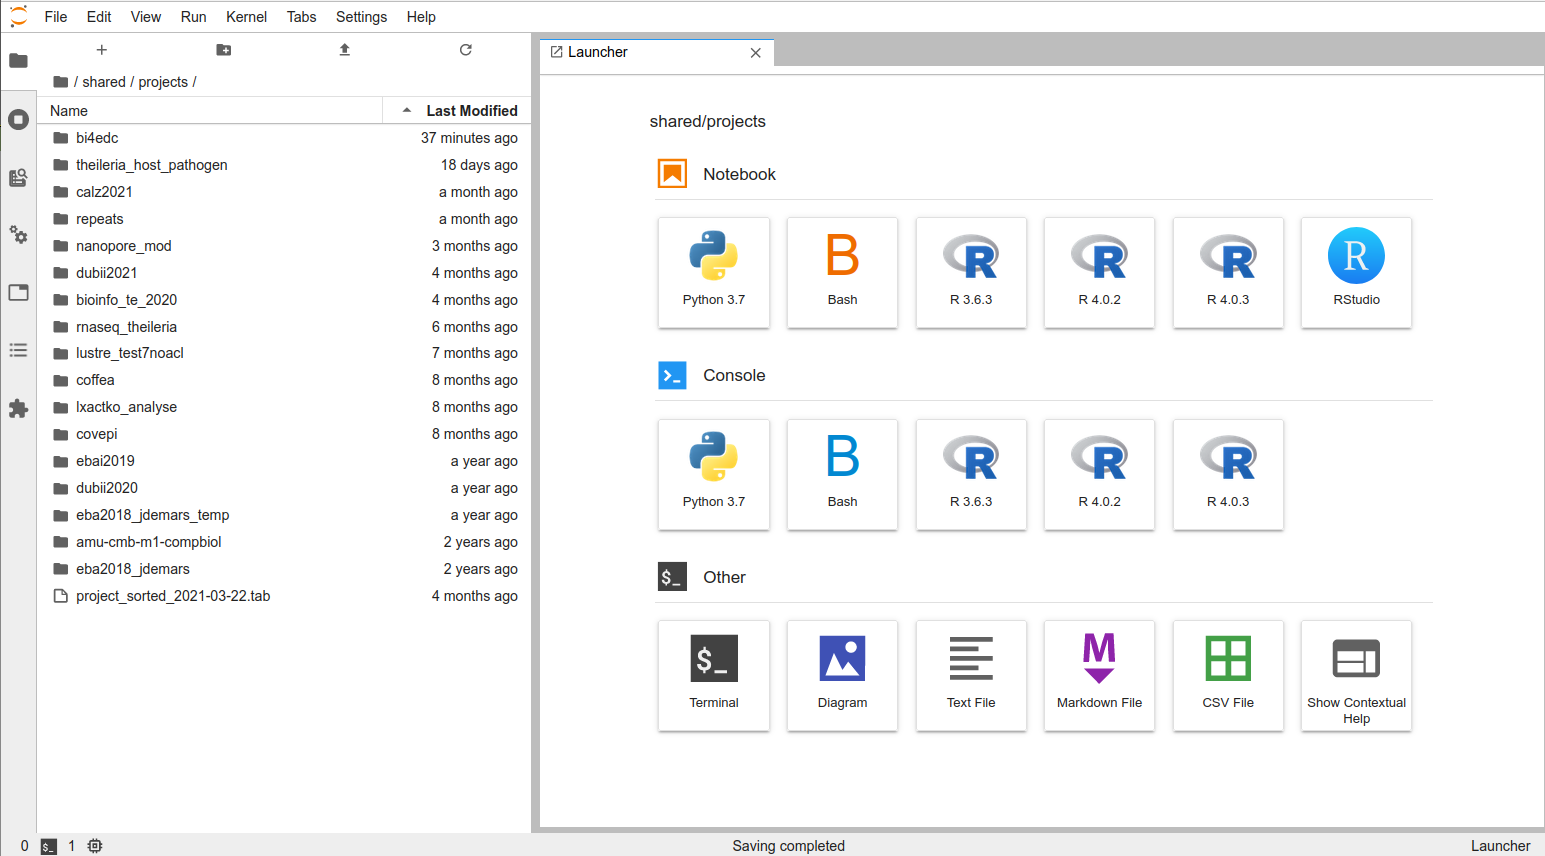
If you’re using the Jupyter Hub on IFB, you can open a Terminal by clicking on the corresponding icon.
Before clonning RASflow_EDC, go to your project using the cd command.
[username @ cpu-node-12 ]$ cd /shared/projects/YourProjectName
Now you can clone the repository (use -b v1.3 if you want to specify the version).
[username@clust-slurm-client YourProjectName]$ git clone https://github.com/parisepigenetics/RASflow_EDC
Cloning into 'RASflow_EDC'...
remote: Enumerating objects: 670, done.
remote: Counting objects: 100% (42/42), done.
remote: Compressing objects: 100% (41/41), done.
remote: Total 670 (delta 1), reused 31 (delta 1), pack-reused 628
Receiving objects: 100% (670/670), 999.24 MiB | 32.76 MiB/s, done.
Resolving deltas: 100% (315/315), done.
Checking out files: 100% (84/84), done.
Enter RASflow_EDC directory (cd) and look at the files using tree or ls.
[username@clust-slurm-client YourProjectName]$ cd RASflow_EDC
[hennion @ ipop-up 09:23]$ RASflow_EDC : tree -L 2
.
├── configs
│   ├── cluster_config_ifb.yaml
│   ├── cluster_config.yaml
│   ├── config_main.yaml
│   └── metadata.tsv
├── images
│   └── banner.png
├── LICENSE
├── main_cluster.py
├── README.md
├── scripts
│   ├── check_config.py
│   ├── combine2group_genome.py
│   ├── combine2group_trans.R
│   ├── dea_genome.R
│   ├── dea_trans.R
│   ├── edc_workflows.py
│   ├── getquota2.sh
│   ├── HISAT2_ipop.sh
│   ├── mergeCounts.py
│   ├── mergeSummaries.py
│   ├── parse_yaml.sh
│   ├── pca.R
│   ├── pca_trans.R
│   ├── reporting.py
│   ├── rmsk2gtf.py
│   ├── StarIndex_ipop.sh
│   ├── StarIndex.sh
│   ├── TEcount.py
│   ├── TEToolkit
│   └── TEtranscripts_indexer.py
├── TestDataset
│   ├── configs
│   ├── gtf
│   ├── hisat2_index
│   ├── Raw_fastq
├── Unlock.sh
├── workflow
│   ├── align_count_genome.rules
│   ├── config.qc.schema.yaml
│   ├── dea_genome.rules
│   ├── dea_trans.rules
│   ├── quality_control.rules
│   ├── quantify_trans.rules
│   ├── rasflow.yaml
│   ├── Singularity_ncbi
│   └── trim.rules
└── Workflow.sh
RASflow is launched as a python script named main_cluster.py which calls the workflow manager named Snakemake. Snakemake will execute rules that are defined in workflow/xxx.rules and distribute the corresponding jobs to the computing nodes via SLURM.
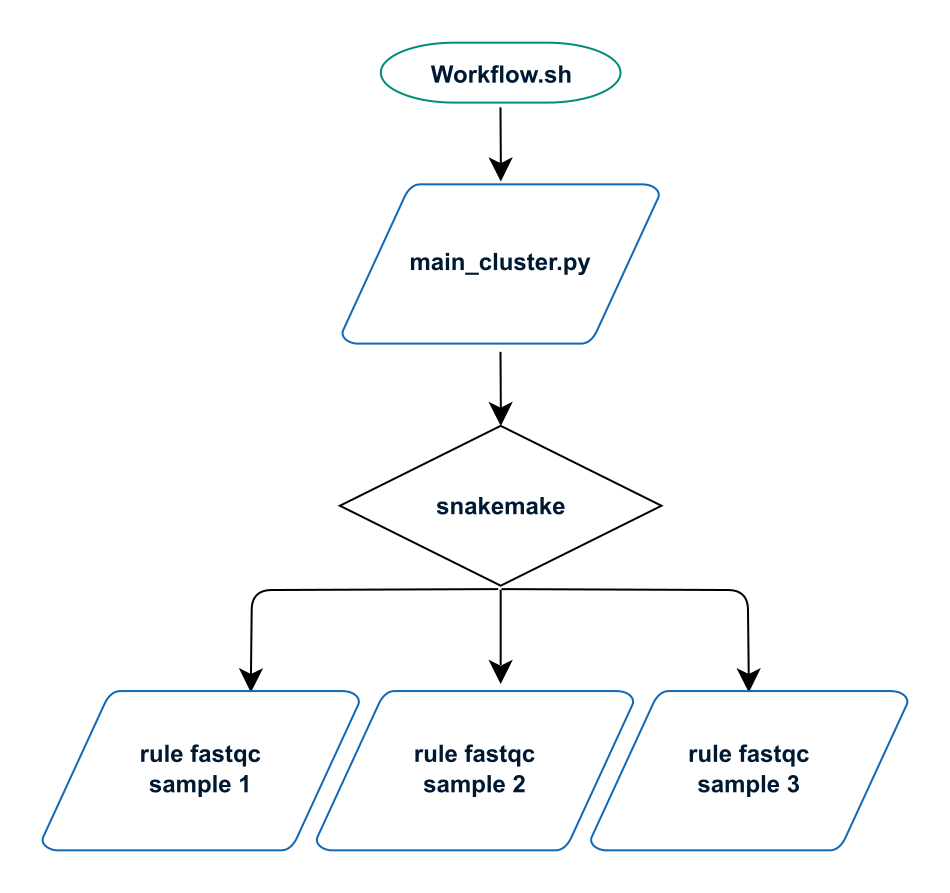
On the cluster, the main python script is launched via the shell script Workflow.sh, which basically contains only one command python main_cluster.py (+ loading of basic modules and information about the run).
![]()
Adapt to your cluster
A configuration file with the specifity of your cluster is needed. It has to be named configs/cluster_config.yaml. Predefined files are available for IFB and iPOP-UP clusters.
For IFB, you should type:
cp configs/cluster_config_ifb.yaml configs/cluster_config.yaml
For iPOP-UP:
cp configs/cluster_config_ipop.yaml configs/cluster_config.yaml
For other clusters, you have to edit the file yourself…
Quick start with the test dataset
Before running your analyses you can use the test dataset to make and check your installation. First copy the configuration file corresponding to the test.
[username@clust-slurm-client RASflow_EDC]$ cp TestDataset/configs/config_main.yaml configs/
Then start the workflow.
[username@clust-slurm-client RASflow_EDC]$ sbatch Workflow.sh
This will run the quality control of the raw FASTQ. See FASTQ quality control for detailed explanations. If everything goes find you will see the results in TestDataset/results/Test1/fastqc. See also how to follow your jobs to know how to check that the run went fine.
You can now move on with your own data, or run the rest of the workflow on the test dataset. To do so you have to modify configs/config_main.yaml turning QC entry from “yes” to “no”. If you don’t know how to do that, see Preparing the run. Then restart the workflow.
[username@clust-slurm-client RASflow_EDC]$ sbatch Workflow.sh
Detailed explanation of the outputs are available in Workflow results.
![]()
Transfer your data
If you want to use your own data, you should transfer the FASTQ files into your project folder /shared/projects/YourProjectName before doing your analysis. Alternatively the workflow allows you to download data from SRA simply giving the SRRxxx IDs, see below metadata.tsv.
FASTQ names
The workflow is expecting gzip-compressed FASTQ files with names formatted as
SampleName_R1.fastq.gzandSampleName_R2.fastq.gzfor pair-end data,SampleName.fastq.gzfor single-end data.
If your files are not fitting this format, please see how to correct the names of a batch of FASTQ files.
Generate md5sum
It is highly recommended to check the md5sum for big files. If your raw FASTQ files are on your computer in PathTo/RNAseqProject/Fastq/, you type in a terminal:
You@YourComputer:~$ cd PathTo/RNAseqProject
You@YourComputer:~/PathTo/RNAseqProject$ md5sum Fastq/* > Fastq/fastq.md5
Copy to the cluster
You can then copy the Fastq folder to the cluster using rsync, replacing username by your login:
You@YourComputer:~/PathTo/RNAseqProject$ rsync -avP Fastq/ username@core.cluster.france-bioinformatique.fr:/shared/projects/YourProjectName/Raw_fastq
In this example the FASTQ files are copied from PathTo/RNAseqProject/Fastq/ on your computer into a folder named Raw_fastq in your project folder on IFB core cluster. On iPOP-UP cluster, only the address is different:
You@YourComputer:~/PathTo/RNAseqProject$ rsync -avP Fastq/ username@ipop-up.rpbs.univ-paris-diderot.fr:/shared/projects/YourProjectName/Raw_fastq
Feel free to name your folders as you want! You will be asked to enter your password, and then the transfer will begin. If it stops before the end, rerun the last command, it will only add the incomplete/missing files.
Check md5sum
After the transfer, connect to the cluster (IFB, iPOP-UP) and check the presence of the files in Raw_fastq using ls command.
[username@clust-slurm-client YourProjectName]$ ls Raw_fastq
Check that the transfer went fine using md5sum.
[username@clust-slurm-client YourProjectName]$ cd Raw_fastq
[username@clust-slurm-client Raw_fastq]$ md5sum -c fastq.md5
![]()
Preparing the run
There are 2 files that you have to modify before running your analysis (metadata.tsv and config_main.yaml in the configs folder), and eventually some others not mandatory.
To modify the text files from the terminal you can use vi or nano on iPOP-UP cluster, plus emacs and gedit (the last one being easier to use) on IFB.
You can also work on your computer and copy the files to the cluster using the scp command or the graphic interface FileZilla.
You can find useful help to manage your data on IFB core documentation.
If you’re using the IFB Jupyter Hub, it’s easy as text and table editors are included, you just have to double click on the file you want to edit, modify and save it using the menu File/Save or Ctrl+S.
metadata.tsv
The experimental description is set up in config/metadata.tsv:
[username@clust-slurm-client RASflow_EDC]$ cat configs/metadata.tsv
sample	group	subject
D197-D192T27	J0_WT	1
D197-D192T28	J0_WT	2
D197-D192T29	J0_WT	3
D197-D192T30	J0_KO	1
D197-D192T31	J0_KO	2
D197-D192T32	J0_KO	3
D197-D192T33	J10_WT	1
D197-D192T34	J10_WT	2
D197-D192T35	J10_WT	3
D197-D192T36	J10_KO	1
D197-D192T37	J10_KO	2
D197-D192T38	J10_KO	3
On Jupyter Hub:
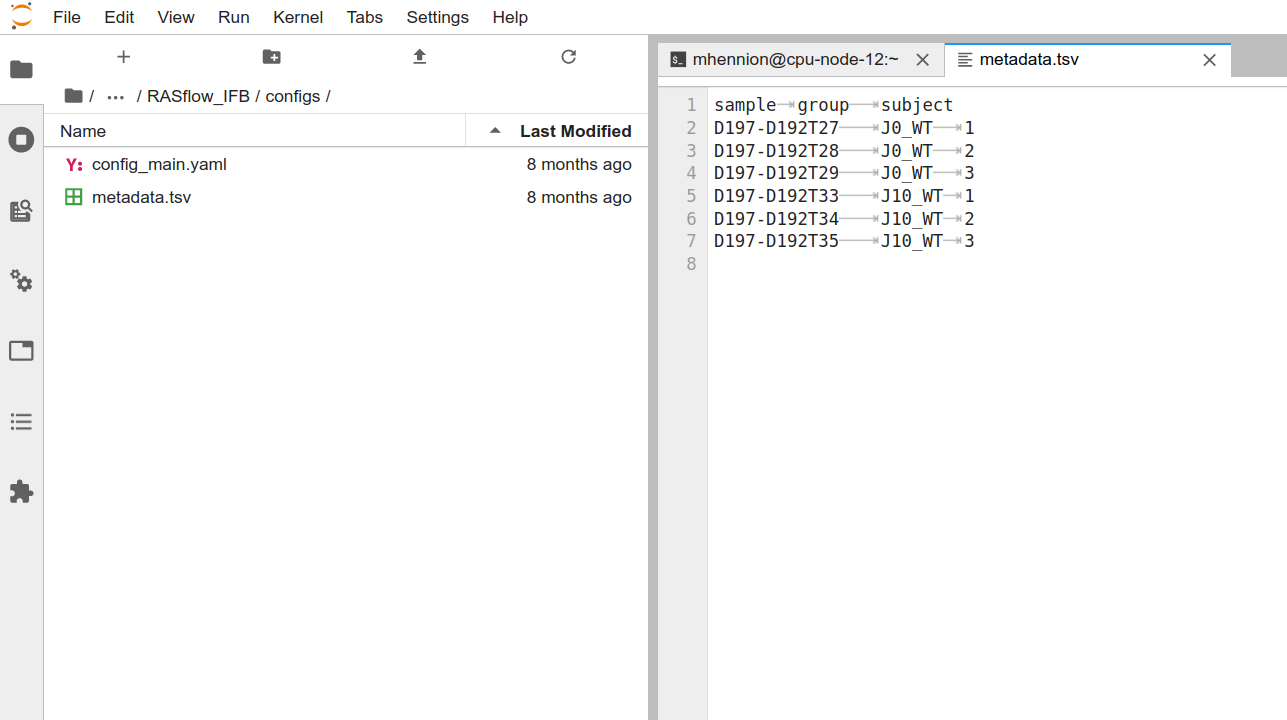
The first column contains the sample names that have to correspond to the FASTQ names (for instance here D197-D192T27_R1.fastq.gz). The second column describes the group the sample belongs to and will be used for differential expression analysis. The last column contains the replicate number or subject. If the samples are paired, for instance 2 samples from the same patient taken at different times, the subject number should be the same (this information is important for differential expression analysis). You can rename or move that file, as long as you adapt the METAFILE entry in config_main.yaml (see below).
config_main.yaml
The configuration of the workflow (see step by step description below) is done in config/config_main.yaml. This is the most important file. It controls the workflow and many tool parameters.
The configuration file contains 3 parts:
1) Define a project name and the steps of the workflow you want to run
[username@clust-slurm-client RASflow_EDC]$ cat configs/config_main.yaml
# Project name
PROJECT: Awesome_experience
# ================== Control of the workflow ==================

## Do you want to download FASTQ files from public from Sequence Read Archive (SRA) ?
SRA: no  # "yes" or "no". If set to "yes", the workflow will stop after the QC to let you decide whether you want to trim your raw data or not. In order to run the rest of the workflow, you have to set it to "no".

## Do you need to do quality control?
QC: yes  # "yes" or "no". If set to "yes", the workflow will stop after the QC to let you decide whether you want to trim your raw data or not. In order to run the rest of the workflow, you have to set it to "no".

## Do you need to do trimming?
TRIMMED: yes  # "yes" or "no"?

## Do you need to do mapping and feature counting?
MAPPING: yes # "yes" or "no"

## Which mapping reference do you want to use? Genome or transcriptome?
REFERENCE: genome  # "genome" or "transcriptome", I haven't implemented transcriptome yet.

## Do you want to study the repeats?
REPEATS: yes # "yes" or "no"

## Do you want to do Differential Expression Analysis (DEA)?
DEA: yes  # "yes" or "no"
2) Shared parameters
Here you define where the FASTQ files are stored, where is the file describing the experimental set up, the name and localization of the folders where the results will be saved. The results (detailed in Workflow results) are separated into two folders:
- the big files: trimmed FASTQ, bam files are in an specific folder defined at
BIGDATAPATH - the small files: QC reports, count tables, BigWig, etc. are in the final result folder defined at
RESULTPATH
Examples are given in the configuration file, but you’re free to name and organise them as you want. Be sure to include the full path (starting from/). Here you also precise if your data are paired-end or single-end and the number of CPUs you want to use for your analysis.
# ================== Shared parameters for some or all of the sub-workflows ==================

## key file if the data is stored remotely, otherwise leave it empty
KEY:

## the path to fastq files
READSPATH: /shared/projects/YourProjectName/Raw_fastq

## the meta file describing the experiment settings
METAFILE: /shared/projects/YourProjectName/RASflow_EDC/configs/metadata.tsv

## paths for intermediate final results
BIGDATAPATH: /shared/projects/YourProjectName/RASflow_EDC/data # for big files
RESULTPATH: /shared/projects/YourProjectName/RASflow_EDC/results

## is the sequencing paired-end or single-end?
END: pair  # "pair" or "single"

## number of cores you want to allocate to this workflow
NCORE: 24  # Use command "getconf _NPROCESSORS_ONLN" to check the number of cores/CPU on your machine
3) Configuration of the specific tools
Here you precise parameters that are specific to one of the steps of the workflow. See detailed description in step by step analysis.
# ================== Configuration for Quality Control ==================

## All required params have already been defined in the public params

# ================== Configuration for trimming ==================

## Number of trimmed bases
## put "no" for TRIM3 and TRIM5 if you don't want to trim a fixed number of bases.
TRIM5: no #  integer or "no", remove N bp from the 5' end of reads. This may be useful if the qualities were very poor, or if there is some sort of unwanted bias at the 5' end.
TRIM3: no # integer or "no", remove N bp from the 3' end of reads AFTER adapter/quality trimming has been performed.

# ================== Configuration for quantification using transcriptome ==================

## transcriptome file
TRANS: /shared/.. # not yet implemented

# ================== Configuration for alignment to genome and feature count ==================

## aligner
ALIGNER: HISAT2 # "STAR" or "HISAT2"

## genome and annotation files
INDEXPATH: /shared/bank/homo_sapiens/hg38/hisat2 # folder containing index files
INDEXBASE: genome # for hisat2, base of the name of the index files (ie genome.1.ht2)
ANNOTATION: /shared/projects/YourProjectName/RASflow_EDC/gtf/gencode.v34.annotation.gtf # GTF file

## bigwig option
BWSTRANDED: both # "no": bw merging forward and reverse reads, "yes": get 2 bw files, one forward and one reverse; "both": get the two bw per strand as well as the merge one.

## tool for feature count
COUNTER: featureCounts # "featureCounts" or "htseq-count" or "STARcount" (only with STAR aligner, --quantMode GeneCounts option) or "TEcount" (if REPEATS: yes)

## counting options
[...]
Workflow.sh [Facultative]
In Workflow.sh, you can modify the Job name and the Output folder to save SLURM outputs. If you don’t change this file, SLURM outputs will be saved in a slurm_output folder that will be created in your working directory. The line is read if it starts with one # and is not used if it starts with 2 (or more) #. For instance here
[username@clust-slurm-client RASflow_EDC]$ cat Workflow.sh
#!/bin/bash

################################ Slurm options #################################

### Job name
##SBATCH --job-name=RASflow

### Output
##SBATCH --output=RASflow-%j.out
[...]
the default names slurm-xxx will be used, whereas here
#!/bin/bash

################################ Slurm options #################################

### Job name
#SBATCH --job-name=RASflow

### Output
#SBATCH --output=TheFolderIwant/RASflow-%j.out
[...]
the job name will be RASflow and SLURM output (only for the snakemake commands, not for the jobs launched by snakemake) will go to TheFolderIwant/RASflow-%j.out.
![]()
Running your analysis step by step
When the configuration files are ready, you can start the run by sbatch Workflow.sh.
[username@clust-slurm-client RASflow_EDC]$ sbatch Workflow.sh
Please see below detailed explanation.
FASTQ quality control (eventually after SRA data retrieval)
Prerequisite:
- Using your own data: your FASTQ files are on the cluster, in our example in
/shared/projects/YourProjectName/Raw_fastq(but you can name your folders as you want, as long as you adjust theREADSPATHparameter inconfig_main.yaml). - You have modified
config/metadata.tsvaccording to your experimental design (with sample names or SRR identifiers).
Now you have to check in config/config_main.yaml that:
- you gave a project name
# Project name
PROJECT: EXAMPLE
- In
Control of the workflow,QCorSRAis set toyes:
If you want to download data from SRA, set SRA to yes. The QC will follow automatically. If you use your own data, put QC to yes and SRA to no.
## Do you want to download FASTQ files from public from Sequence Read Archive (SRA) ?
SRA: no  # "yes" or "no". If set to "yes", the workflow will stop after the QC to let you decide whether you want to trim your raw data or not. In order to run the rest of the workflow, you have to set it to "no".

## Do you need to do quality control?
QC: yes  # "yes" or "no". If set to "yes", the workflow will stop after the QC to let you decide whether you want to trim your raw data or not. In order to run the rest of the workflow, you have to set it to "no".
The rest of the part Control of the workflow will be ignored. The software will stop after the QC to give you the opportunity to decide if trimming is necessary or not.
- The shared parameters are correct (paths to the FASTQ files, metadata.tsv, result folders, single or paired-end data).
## the path to fastq files
READSPATH: /shared/projects/YourProjectName/Raw_fastq

## the meta file describing the experiment settings
METAFILE: /shared/projects/YourProjectName/RASflow_EDC/configs/metadata.tsv

## paths for intermediate and final results
BIGDATAPATH: /shared/projects/YourProjectName/RASflow_EDC/data # for big files
RESULTPATH: /shared/projects/YourProjectName/RASflow_EDC/results

## is the sequencing paired-end or single-end?
END: pair  # "pair" or "single"

## number of cores you want to allocate to this workflow
NCORE: 24  # Use command "getconf _NPROCESSORS_ONLN" to check the number of cores/CPU on your machine
When this is done, you can start the QC by running:
[username@clust-slurm-client RASflow_EDC]$ sbatch Workflow.sh
You can check if your job is running using squeue.
[username@clust-slurm-client RASflow_EDC]$ squeue -u username
You should also check SLURM output files. See Description of the log files.
FastQC results
If everything goes fine, fastQC results will be in results/EXAMPLE/fastqc/. For every sample you will have something like:
[username@clust-slurm-client RASflow_EDC]$ ll results/EXAMPLE/fastqc
total 38537
-rw-rw----+ 1 username username  640952 May 11 15:16 Sample1_forward_fastqc.html
-rw-rw----+ 1 username username  867795 May 11 15:06 Sample1_forward_fastqc.zip
-rw-rw----+ 1 username username  645532 May 11 15:16 Sample1_reverse_fastqc.html
-rw-rw----+ 1 username username  871080 May 11 15:16 Sample1_reverse_fastqc.zip
Those are individual fastQC reports. MultiQC is called after FastQC, so you will also find report_quality_control.html that is a summary for all the samples.
You can copy those reports to your computer by typing (in a new local terminal):
You@YourComputer:~$ scp -pr username@core.cluster.france-bioinformatique.fr:/shared/projects/YourEXAMPLE/RASflow_EDC/results/EXAMPLE/fastqc PathTo/WhereYouWantToSave/
or look at them directly in the Jupyter Hub or using your file navigator. It’s time to decide if you need trimming or not. If you have no sequence bias, and little amount of adapters, trimming is not necessary and you can proceed directly to the mapping step.
Trimming
If you put TRIMMED: no, there will be no trimming and the original FASTQ sequences will be mapped.
If you put TRIMMED: yes, Trim Galore will remove low quality and very short reads, and cut the adapters. If you also want to remove a fixed number of bases in 5’ or 3’, you have to configure it. For instance if you want to remove the first 10 bases:
# ================== Control of the workflow ==================

## Do you need to do quality control?
QC: no  # "yes" or "no". If set to "yes", the workflow will stop after the QC to let you decide whether you want to trim your raw data or not. In order to run the rest of the workflow, you have to set it to "no".

## Do you need to do trimming?
TRIMMED: "yes"  # "yes" or "no"?
[...]
# ================== Configuration for trimming ==================

## Number of trimmed bases
## put "no" for TRIM3 and TRIM5 if you don't want to trim a fixed number of bases.
TRIM5: 10 #  integer or "no", remove N bp from the 5' end of reads. This may be useful if the qualities were very poor, or if there is some sort of unwanted bias at the 5' end.
TRIM3: no # integer or "no", remove N bp from the 3' end of reads AFTER adapter/quality trimming has been performed.
Mapping on the whole genome or on transcriptome
For gene expression analysis, two approaches are available, you can either map your reads on the whole genome (HISAT2 or STAR) and then count the reads on the genes or transcripts, or you can quantify the reads directly on the transcriptome (Salmon). This is faster and adapted when you have a lot of samples and are only interested in known gene expression and not in repeats.
Mapping and counting
At this step you have to choose the aligner you want (HISAT2 or STAR), to provide the path to corresponding genome index as well as to a GTF annotation file.
[username@clust-slurm-client ~]$ tree -L 2 /shared/bank/homo_sapiens/
/shared/bank/homo_sapiens/
├── GRCh37
│   ├── bowtie2
│   ├── fasta
│   ├── gff
│   ├── star -> star-2.7.2b
│   ├── star-2.6
│   └── star-2.7.2b
├── GRCh38
│   ├── bwa
│   ├── fasta
│   ├── gff
│   ├── star -> star-2.6.1a
│   └── star-2.6.1a
├── hg19
│   ├── bowtie
│   ├── bowtie2
│   ├── bwa
│   ├── fasta
│   ├── gff
│   ├── hisat2
│   ├── picard
│   ├── star -> star-2.7.2b
│   ├── star-2.6
│   └── star-2.7.2b
└── hg38
    ├── bowtie2
    ├── fasta
    ├── star -> star-2.7.2b
    ├── star-2.6
    └── star-2.7.2b

30 directories, 0 files
If you don’t find what you need, you can ask for it on IFB or iPOP-UP community support. In case you don’t have a quick answer, you can download (for instance here) or produce the indexes you need in your folder (and remove it when it’s available in the common banks).
- HISAT2 indexes can be found here. Right click on the file you need and copy the link. Then paste the link to
wget. When downloading is over, you have to decompress the file.
[username@clust-slurm-client RASflow_EDC]$ wget https://cloud.biohpc.swmed.edu/index.php/s/hg38/download
--2020-05-25 11:03:21--  https://cloud.biohpc.swmed.edu/index.php/s/hg38/download
Resolving cloud.biohpc.swmed.edu (cloud.biohpc.swmed.edu)... 129.112.9.92
Connecting to cloud.biohpc.swmed.edu (cloud.biohpc.swmed.edu)|129.112.9.92|:443... connected.
HTTP request sent, awaiting response... 200 OK
Length: 4355786349 (4,1G) [application/x-gzip]
Saving to: ‘download’

100%[==========================================================================================================================>] 4 355 786 349 24,6MB/s   in 2m 51s

2020-05-25 11:06:13 (24,3 MB/s) - ‘download’ saved [4355786349/4355786349]
[username@clust-slurm-client index]$ mv download hg38.tar.gz
[username@clust-slurm-client index]$ tar -zxvf hg38.tar.gz
- STAR indexes depend on STAR version. STAR 2.7.5a is used here, the indexes should be made with version 2.7.5a or 2.7.4a to be compatible. If you don’t find the indexes you need, you can generate them from your genome FASTA. To do so, you can run
StarIndex.shgiving the path to your genome FASTA file (here/shared/bank/homo_sapiens/hg38/fasta/hg38.faand to the output directory where the index will be saved (hereindex/STAR_2.7.5a/hg38).
[username@clust-slurm-client RASflow_EDC]$ sbatch scripts/StarIndex.sh /shared/bank/homo_sapiens/hg38/fasta/hg38.fa index/STAR_2.7.5a/hg38
- GTF files can be downloaded from GenCode (mouse and human), ENSEMBL, NCBI (RefSeq, help here), …
Similarly you can download them to the server using
wget.
Be sure you give the right path to those files and adjust the other settings to your need:
# ================== Control of the workflow ==================
[...]
## Which mapping reference do you want to use? Genome or transcriptome?
REFERENCE: genome  # "genome" or "transcriptome"
[...]
# ================== Configuration for alignment to genome and feature count ==================

## aligner
ALIGNER: HISAT2 # "STAR" or "HISAT2"

## genome and annotation files
INDEXPATH: /shared/bank/homo_sapiens/hg38/hisat2 # folder containing index files
INDEXBASE: genome  # base of the name of the index files (ie genome.1.ht2)
ANNOTATION: /shared/projects/YourProjectName/RASflow_EDC/gtf/gencode.v34.annotation.gtf # GTF file

## bigwig option
BWSTRANDED: both # "no": bw merging forward and reverse reads, "yes": get 2 bw files, one forward and one reverse; "both": get the two bw per strand as well as the merge one.

## tool for feature count
COUNTER: featureCounts # "featureCounts" or "htseq-count" or "STARcount" (only with STAR aligner, --quantMode GeneCounts option) or "TEcount" (if REPEATS: yes)

## counting options
COUNTOPTIONS: "-M --fraction" # add extra options for the counter (for featureCounts or htseq-count only).
# featureCounts: '-O' (set allowMultiOverlap to TRUE), '-M' (set countMultiMappingReads to TRUE), '--fraction'.
# htseq-count: -m <mode> ; --nonunique=<nonunique mode>; ... see https://htseq.readthedocs.io
ATTRIBUTE: gene_id  # the attribute used in annotation file. It's usually "gene_id", but double check that since it may also be "gene", "ID"...
STRAND: reverse # "no", "yes", "reverse". For stranded=no, a read is considered overlapping with a feature regardless of whether it is mapped to the same or the opposite strand as the feature. For stranded=yes and single-end reads, the read has to be mapped to the same strand as the feature. For paired-end reads, the first read has to be on the same strand and the second read on the opposite strand. For stranded=reverse, these rules are reversed.
FEATURE: transcript # "exon", "gene", "transcript", ... depending on your GTF file and on the feature you're interested in.
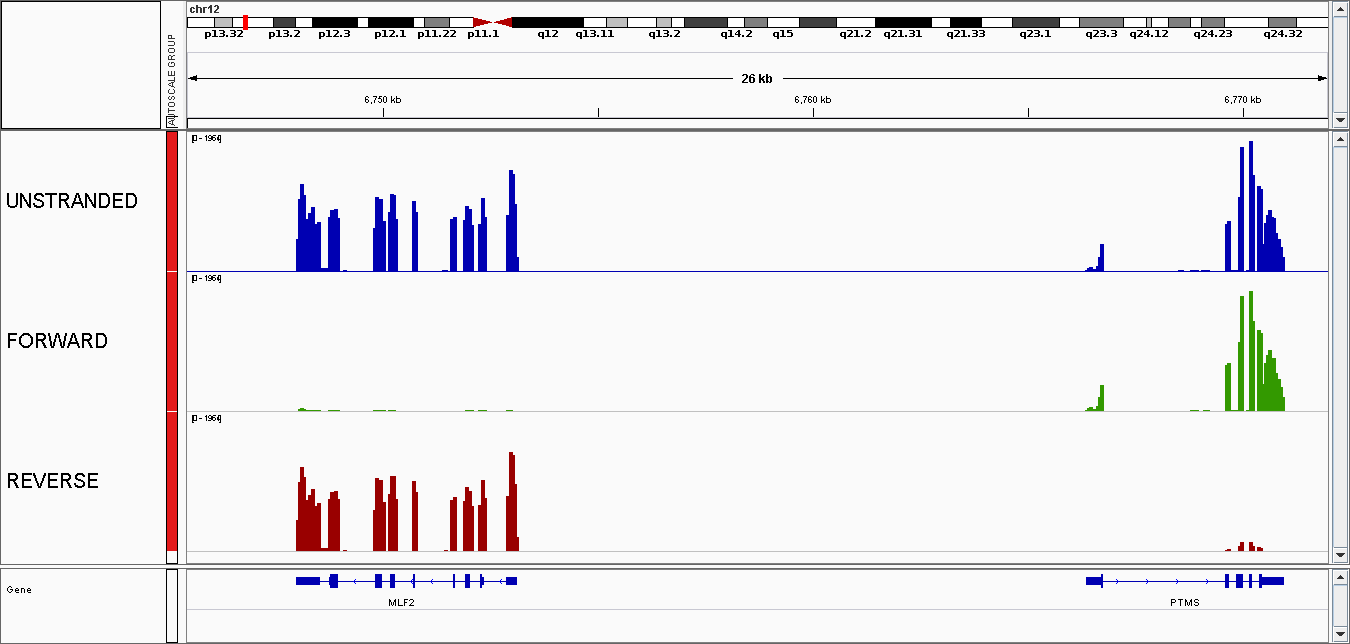
For an easy visualisation on a genome browser, BigWig files are generated. You can choose if you want to separate forward and reverse reads setting BWSTRANDED.
If you use STAR, count tables are generated during the mapping step (with --quantMode GeneCounts option). If you want to use them for DEA, you have to set COUNTER to STARcount.
Two other counters are available:
-
featureCounts (SubReads package)
Both are running with default parameters unless you add parameters in COUNTOPTIONS.
As at the moment the default project quota in 250 Go you might be exceeding the space you have (and may or may not get error messages…). So if featureCounts fails, try removing files to get more space, or ask to increase your quota on IFB Community support or iPOP-UP Community support. To see the space you have you can run:
[username@clust-slurm-client RASflow_EDC]$ du -h --max-depth=1 /shared/projects/YourProjectName/
and
[username@clust-slurm-client RASflow_EDC]$ lfsgetquota YourProjectName
Repeats analysis
It is possible to analyse the repeat expression. To do so, you have to set REPEATS to yes in config_main.yaml and to choose an appropriate counter, ie featureCounts or TEcount (from TEtranscripts). You also have to give the path to the GTF of the repeats. You can make it using http://genome.ucsc.edu/cgi-bin/hgTables.
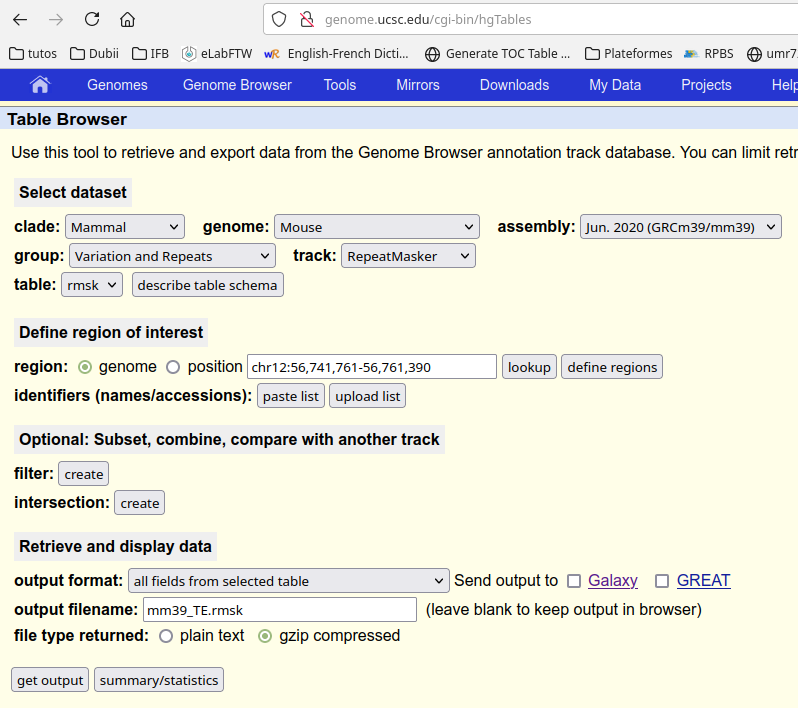
You have to download the table and to copy it to the cluster (or upload it directly into the Jupyter Hub). For instance:
You@YourComputer:~$ scp mm39_TE.rmsk.gz username@core.cluster.france-bioinformatique.fr:/shared/projects/YourProjectName/RASflow_EDC/
Then you decompress it on the cluster.
[username@clust-slurm-client RASflow_EDC]$ mkdir gtf  # create a folder
[username@clust-slurm-client RASflow_EDC]$ mv mm39_TE.rmsk.gz gtf # mv your rmsk file into the folder gtf
[username@clust-slurm-client RASflow_EDC]$ cd gtf # go to gtf folder
[username@clust-slurm-client gtf]$ gzip -d mm39_TE.rmsk.gz # decompress the file
A small script is available to transform this table into a GTF.
[username@clust-slurm-client gtf]$ module load python
[username@clust-slurm-client gtf]$ python ../scripts/rmsk2gtf.py mm39_TE.rmsk mm39_TE_rmsk.gtf transcript
The last argument (here transcript) should fit the feature you have choosen for counting:
FEATURE: transcript # "exon", "gene", "transcript", ... depending on your GTF file and on the feature you're interested in.
You can then give the path to your repeat GTF in the configuration file.
# ================== Configuration for repeat analysis ==================

GTFTE: /shared/projects/YourProjectName/RASflow_EDC/gtf/mm39_TE_rmsk.gtf  # GTF ANNOTATION file for repeats, must be adapted to have the FEATURE you chose ("exon", "gene", "transcript") as 3rd column.
Transcriptome quantification
If you want to use Salmon and do quick transcripts quantification, you have to set the key REFERENCE to transcriptome and to adjust the parameters in Configuration for quantification using transcriptome part.
# ================== Control of the workflow ==================
[...]
## Which mapping reference do you want to use? Genome or transcriptome?
REFERENCE: genome  # "genome" or "transcriptome"
[...]
# ================== Configuration for quantification using transcriptome ==================

## transcriptome file
TRANS: /shared/banks/homo_sapiens/hg38/transcriptome/gencode.v41.transcripts.fa

## Do you need to do gene-level differential expression analysis?
GENE_LEVEL: yes  # yes or no. If "no", ignore the following 3 parameters.
## If "yes", specify the corresponding dataset in ENSEMBL for your interested organism or provide your own tx2gene
ENSEMBL: yes  # yes or no. Specify whether you're using transcriptome from Ensembl
EnsemblDataSet: hsapiens_gene_ensembl  # only if ENSEMBL was set to "yes".
## If you're not using ENSEMBL, you have to provide your homemade tx2gene file (two columns, 1st col: transcript ID; 2nd col: gene ID)
TX2GENE: tx2gene_custom.tsv  # only if ENSEMBL was set to "no"
You can either use Ensembl transcriptomes or provide a homemade tx2gene file.
Differential expression analysis and visualization
Finally you have to set the parameters for the differential expression analysis. You have to define the comparisons you want to do (pairs of conditions) and to choose if you want to use edgeR or DESeq2.
# ================== Configuration for DEA ==================

## Do you want to start the workflow directly from the count tables obtained independently? If yes, give the path of your count tables.
FROMCOUNTS: no # TestDataset/MyCounts   # put 'no' when using the whole workflow, or the path of your count tables. Format: one file / sample named {sample}_countGenes.tsv, 2 columns gene'\tab'count.

## Do you want to use edgeR or DESeq2 to do DEA?
DEATOOL: edgeR  # "edgeR" or "DESeq2"? DESeq2 is recommended for transcriptome-based DEA

## Is your experiment designed in a pair-wise way?
PAIR: no  # Is this a pair test or not? (yes or no). For instance 2 samples from the same patient taken at different times.

## the comparison(s) you want to do. If multiple comparisons, specify each pair (CONTROL & TREAT) in order respectively
CONTROL: ["J0_WT","J0_WT","J10_WT","J0_KO"]
TREAT: ["J0_KO","J10_WT","J10_KO","J10_KO"]
## length of 'CONTROL' should agree with that of 'TREAT'
## what you fill in there should agree with the "group" column in metadata.tsv

FILTER: yes  # Filter out low expressed transcripts/genes or not? (yes or no). It's generally  better to be set to "yes".
Differential expression analysis from external count tables
You have the possibility to analyse count tables obtained independently from the workflow. This might raise reproducibility issues, be sure to document as much as possible the way those tables were obtained. They have to be raw count tables, not normalized. You need one file / sample, named as {sample}_countGenes.tsv and formatted with 2 tab-separated columns : gene'\tab'count. The path to your count tables should be indicated in FROMCOUNTS entry.
Start the workflow
When the configuration files are fully adapted to your experimental set up and needs, you can start the workflow by running:
[username@clust-slurm-client RASflow_EDC]$ sbatch Workflow.sh
![]()
Description of the log files
The first job is the main script. This job will call one or several snakefiles (.rules files) that define small workflows of the individual steps. There are SLURM outputs at the 3 levels.
The configuration of the run and the timing are also saved:
Where to find those outputs and what do they contain?
Main script
The output is in slurm_output and named RASflow-xxx.out (default) or in the specified folder if you modified Workflow.sh. A copy is also available in the logs folder. It contains global information about your run.
Typically the main job output looks like :
[username@clust-slurm-client RASflow_EDC]$ cat slurm_output/RASflow-13350656.out
########################################
Date: 2022-01-21T10:49:54+0100
User: username
Host: cpu-node-27
Job Name: RASflow
Job Id: 20812273
Directory: /shared/projects/YourProjectName/RASflow_EDC
########################################
RASflow_IFB version: v0.6.2
-------------------------
Main module versions:
Python 3.9.5
snakemake
6.5.0
-------------------------
PATH:
/shared/ifbstor1/software/miniconda/envs/snakemake-6.5.0/bin:/shared/ifbstor1/software/miniconda/bin/:/shared/ifbstor1/software/miniconda/bin:/shared/ifbstor1/software/miniconda/condabin:/opt/status_bars/status_bars/:/shared/software/sinteractive:/shared/software/modules/4.6.1/bin:/usr/local/bin:/usr/bin:/usr/local/sbin:/usr/sbin:/opt/go/1.14.4/bin:/opt/go/packages/bin:/shared/home/mhennion/.local/bin:/shared/home/mhennion/bin
########################################
-------------------------
| RUN ID : 20220121T1049 |
-------------------------
Starting RASflow on project: ThisWillWork
Free disk is measured for the cluster project (folder): YourProjectName
-------------------------
Workflow summary
Is FASTQ quality control required?  no
Is trimming required?  no
Are mapping and counting required?  yes
Which mapping reference will be used?  genome
Do you want to analyse the repeats?  no
Is DEA required?  no
-------------------------
Workflow running....
Starting mapping using  genome  as reference...
Mapping is done! (0:03:12)
DEA is not required and RASflow is done!
########################################
---- Errors ----
There were no errors ! It's time to look at your results, enjoy!
########################################
Job finished 2022-01-21T10:53:13+0100
---- Total runtime 199 s ; 3 min ----
You can see at the end if this file if an error occured during the run. See Errors.
Snakefiles
There are 4 snakefiles (visible in the workflow folder) that correspond to the different steps of the analysis:
- quality_control.rules (QC)
- trim.rules (reads trimming/filtering)
- align_count_genome.rules (mapping and counting)
- dea_genome.rules (differential gene expression)
The SLURM outputs of those different steps are stored in the logs folder and named as the date plus the corresponding snakefile: for instance
20200615T1540_trim.txt or 20200615T1540_align_count_genome.txt.
Here is a description of one of those files (splitted):
- Building the DAG (directed acyclic graph): Define the jobs that will be launched and in which order.
Building DAG of jobs...
Using shell: /usr/bin/bash
Provided cluster nodes: 30
Job counts:
	count	jobs
	1	all
	1	getReads
	1	summaryReport
	1	trim
	1	trimstart
	5
- Start the first job (or jobs if there are several independant jobs). The rule is indicated, with the expected outputs. For the first steps one job is started per sample.
[Tue May 12 17:48:20 2020]
rule getReads:
    output: /shared/projects/lxactko_analyse/RASflow/data/LXACT_1-test/trim/reads/Test_forward.fastq.gz, /shared/projects/lxactko_analyse/RASflow/data/LXACT_1-test/trim/reads/Test_reverse.fastq.gz
    jobid: 4
    wildcards: sample=Test

Submitted job 4 with external jobid 7908074.
You have here the corresponding job ID. You can follow that particular job in slurm-7908074.out.
- End of that job, start of the next one:
[Tue May 12 17:48:30 2020]
Finished job 4.
1 of 5 steps (20%) done

[Tue May 12 17:48:30 2020]
rule trimstart:
    input: /shared/projects/lxactko_analyse/RASflow/data/LXACT_1-test/trim/reads/Test_forward.fastq.gz, /shared/projects/lxactko_analyse/RASflow/data/LXACT_1-test/trim/reads/Test_reverse.fastq.gz
    output: /shared/projects/lxactko_analyse/RASflow/data/LXACT_1-test/trim/Test_forward.91bp_3prime.fq.gz, /shared/projects/lxactko_analyse/RASflow/data/LXACT_1-test/trim/Test_reverse.91bp_3prime.fq.gz
    jobid: 3
    wildcards: sample=Test

Submitted job 3 with external jobid 7908075.
- At the end of the job, it removes temporary files if any:
Removing temporary output file /shared/projects/lxactko_analyse/RASflow/data/LXACT_1-test/trim/reads/Test_forward.fastq.gz.
Removing temporary output file /shared/projects/lxactko_analyse/RASflow/data/LXACT_1-test/trim/reads/Test_reverse.fastq.gz.
[Tue May 12 17:49:10 2020]
Finished job 3.
2 of 5 steps (40%) done
- And so on… Finally:
[Tue May 12 17:51:10 2020]
Finished job 0.
5 of 5 steps (100%) done
Complete log: /shared/mfs/data/projects/lxactko_analyse/RASflow/.snakemake/log/2020-05-12T174816.622252.snakemake.log
Individual tasks
Every job generate a slurm-JOBID.out file. It is localised in the working directory as long as the workflow is running. It is then moved to the slurm_output folder. SLURM output specifies the rule, the sample (or samples) involved, and gives outputs specific to the tool:
[username@clust-slurm-client RASflow_EDC]$ cat slurm_output/slurm-8080372.out
Building DAG of jobs...
Using shell: /usr/bin/bash
Provided cores: 32
Rules claiming more threads will be scaled down.
Job counts:
	count	jobs
	1	trimstart
	1

[Fri May 15 10:51:03 2020]
rule trimstart:
    input: /shared/projects/lxactko_analyse/RASflow/data/LXACT_1-test/trim/reads/Test_forward.fastq.gz, /shared/projects/lxactko_analyse/RASflow/data/LXACT_1-test/trim/reads/Test_reverse.fastq.gz
    output: /shared/projects/lxactko_analyse/RASflow/data/LXACT_1-test/trim/Test_forward.91bp_3prime.fq.gz, /shared/projects/lxactko_analyse/RASflow/data/LXACT_1-test/trim/Test_reverse.91bp_3prime.fq.gz
    jobid: 0
    wildcards: sample=Test

[...SOME OUTPUT DEPENDANT ON THE TOOL ...]

[Fri May 15 10:52:30 2020]
Finished job 0.
1 of 1 steps (100%) done
Configuration and timing
Three extra files can be found in the logs folder:
- A log file named
20200615T1540_running_time.txtstores running times.
[username@clust-slurm-client RASflow_EDC]$ cat logs/20200615T1540_running_time.txt

Project name: EXAMPLE
Start time: Mon Jun 15 15:40:13 2020
Time of running trimming: 0:00:12
Time of running genome alignment: 0:08:43
Time of running DEA genome based: 0:01:32
Finish time: Mon Jun 15 15:50:43 2020
- A log file named
20230605T1057_configuration.txtkeeps a track of the configuration of the run (config_main.yamlfollowed bymetadata.tsvand the environment contained in the Apptainer image with all tool versions).
[username@clust-slurm-client RASflow_EDC]$: cat logs/20230605T1057_configuration.txt

# Please check the parameters, and adjust them according to your circumstance

# Project name
PROJECT: TIMING

# ================== Control of the workflow ==================

[...]

==========================================

SAMPLE PLAN
sample	group	subject
D197-D192T27	J0_WT	1
D197-D192T28	J0_WT	2
D197-D192T29	J0_WT	3
D197-D192T30	J0_KO	1
D197-D192T31	J0_KO	2
D197-D192T32	J0_KO	3
D197-D192T33	J10_WT	1
D197-D192T34	J10_WT	2
D197-D192T35	J10_WT	3
D197-D192T36	J10_KO	1
D197-D192T37	J10_KO	2
D197-D192T38	J10_KO	3

==========================================

SINGULARITY IMAGE - yaml file

name: rasflow_EDC
channels:
  - conda-forge
  - bioconda
  - r
  - defaults
dependencies:
# conda-forge channel installs
  - R=4.1
  - python=3.9.13
  - graphviz=3.0.0
  - r-yaml=2.3.5
  - r-statmod=1.4.36
  - r-gplots=3.1.3
[...]
- A log file named
20200925T1057_free_disk.txtstores the disk usage during the run (every minute, the remaining space is measured).# quota:1 limit:1.5 time free_disk 20210726T1611 661 20210726T1612 660 20210726T1613 660 20210726T1614 660 20210726T1615 660 20210726T1616 660If a run stops with no error, it can be that you don’t have enough space in your project. You can see in this file that the free disk tends to 0.
![]()
Workflow results
The results are separated into two folders :
- the big files : trimmed FASTQ and bam files are in the data folder defined in
configs/config_main.yamlatBIGDATAPATH
## paths for intermediate and final results
BIGDATAPATH: /shared/projects/YourProjectName/RASflow_EDC/data # for big files
[username@clust-slurm-client RASflow_EDC]$ tree -L 2 data/EXAMPLE/
data/EXAMPLE/
└── mapping_HISAT2
    ├── bam_byName
    ├── benchmarks
    ├── reads
    ├── Sorted_bam
    └── splicesites.txt
└── trim
    ├── D197-D192T27_forward.91bp_3prime.fq.gz_trimming_report.txt
    ├── D197-D192T27_R1_trimmed_fastqc.html
    ├── D197-D192T27_R1_trimmed_fastqc.zip
    ├── D197-D192T27_R1_trimmed.fq.gz
    ...
- the small files: QC reports, count tables, BigWig, DEA reports, etc. are in the final result folder defined in
configs/config_main.yamlatRESULTPATH
RESULTPATH: /shared/projects/YourProjectName/RASflow_EDC/results
[username@clust-slurm-client RASflow_EDC]$ tree -L 2 results/EXAMPLE/
├── 20210727T1030_report.html
├── 20210727T1030_report.tar.bz2
├── logs
│   ├── 20210727T1030_align_count_genome.txt
│   ├── 20210727T1030_configuration.txt
│   ├── 20210727T1030_dea_genome.txt
│   ├── 20210727T1030_free_disk.txt
│   └── 20210727T1030_running_time.txt
└── mapping_HISAT2
    ├── alignmentQC
    ├── bw_str
    ├── counting_featureCounts
    ├── repeats_featureCounts
    ├── report_align_count_featureCounts_data
    └── report_align_count_featureCounts.html
This way you can get all the results on your computer by running (from your computer):
You@YourComputer:~$ scp -pr username@core.cluster.france-bioinformatique.fr:/shared/projects/YourProjectName/RASflow_EDC/results/EXAMPLE/ PathTo/WhereYouWantToSave/
and the huge files will stay on the server. You can of course download them as well if you have space (and this is recommended for the long term).
Final report
A report named as 20210727T1030_report.html summarizes your experiment and your results. You’ll find links to fastQC results, to mapping quality report, to exploratory analysis of all the samples and finally to pairwise differential expression analyses. Interactive plots are included in the report. They are very helpful to dig into the results. A compressed archive named 20210727T1030_report.tar.bz2 is also generated and contains the report and the targets of the different links, excluding the count and DEA tables to make it small enough to be sent to your collaborators.
An example of report is visible here.
Detailed description of all the outputs of the workflow is included below.
Trimmed reads
After trimming, the FASTQ are stored in the data folder defined in configs/config_main.yaml at BIGDATAPATH:.
In this examples the trim FASTQ files will be stored in /shared/projects/YourProjectName/RASflow_EDC/data/EXAMPLE/trim/. They are named
- Sample1_R1_val_1.fq
- Sample1_R2_val_2.fq
Trimming report
In results/EXAMPLE/trimming you’ll find trimming reports such as Sample1_forward.fastq.gz_trimming_report.txt for each samples. You’ll find information about the tools and parameters, as well as trimming statistics:
SUMMARISING RUN PARAMETERS
==========================
Input filename: data/Trim/trimming/reads/D197-D192T27_reverse.fastq.gz
Trimming mode: paired-end
Trim Galore version: 0.6.4_dev
Cutadapt version: 3.4
Python version: could not detect
Number of cores used for trimming: 4
Quality Phred score cutoff: 20
Quality encoding type selected: ASCII+33
Using Illumina adapter for trimming (count: 6420). Second best hit was smallRNA (count: 181)
Adapter sequence: 'AGATCGGAAGAGC' (Illumina TruSeq, Sanger iPCR; auto-detected)
Maximum trimming error rate: 0.1 (default)
Minimum required adapter overlap (stringency): 1 bp
Minimum required sequence length for both reads before a sequence pair gets removed: 20 bp
Running FastQC on the data once trimming has completed
Output file will be GZIP compressed


This is cutadapt 3.4 with Python 3.7.6
Command line parameters: -j 4 -e 0.1 -q 20 -O 1 -a AGATCGGAAGAGC data/Trim/trimming/reads/D197-D192T27_reverse.fastq.gz
Processing reads on 4 cores in single-end mode ...
Finished in 10.61 s (10 µs/read; 5.94 M reads/minute).

=== Summary ===

Total reads processed:               1,049,477
Reads with adapters:                   369,439 (35.2%)
Reads written (passing filters):     1,049,477 (100.0%)

Total basepairs processed:   105,997,177 bp
Quality-trimmed:                 282,956 bp (0.3%)
Total written (filtered):    104,983,243 bp (99.0%)

=== Adapter 1 ===

Sequence: AGATCGGAAGAGC; Type: regular 3'; Length: 13; Trimmed: 369439 times

No. of allowed errors:
1-9 bp: 0; 10-13 bp: 1

Bases preceding removed adapters:
  A: 30.0%
  C: 31.9%
  G: 25.2%
  T: 12.9%
  none/other: 0.0%

Overview of removed sequences
length	count	expect	max.err	error counts
1	240511	262369.2	0	240511
2	79277	65592.3	0	79277
3	26294	16398.1	0	26294
[...]

RUN STATISTICS FOR INPUT FILE: data/Trim/trimming/reads/D197-D192T27_reverse.fastq.gz
=============================================
1049477 sequences processed in total

Total number of sequences analysed for the sequence pair length validation: 1049477

Number of sequence pairs removed because at least one read was shorter than the length cutoff (20 bp): 532 (0.05%)
This information is summarized in the MultiQC report, see below.
FastQC of trimmed reads
After the trimming, fastQC is automatically run on the new FASTQ and the results are also in the folder results/EXAMPLE/fastqc_after_trimming/:
- Sample1_R1_trimmed_fastqc.html
- Sample1_R1_trimmed_fastqc.zip
- Sample1_R2_trimmed_fastqc.html
- Sample1_R2_trimmed_fastqc.zip
As previously MultiQC gives a summary for all the samples : results/EXAMPLE/fastqc_after_trimming/report_quality_control_after_trimming.html. You’ll find information from the trimming report (for instance you can rapidly see the % of trim reads for the different samples) as well as from fastQC. It is included in the final report (ie 20210727T1030_report.html).
Mapped reads
The mapped reads are stored as sorted bam in the data folder, in our example in data/EXAMPLE/mapping_ALIGNER/Sorted_bam, together with their .bai index. They can be visualized using a genome browser such as IGV but this is not very convenient as the files are heavy. BigWig files, that summarize the information converting the individual read positions into a number of reads per bin of a given size, are more adapted.
BigWig
To facilitate visualization on a genome browser, BigWig files are generated (window size of 50 bp). There are in results/EXAMPLE/mapping_ALIGNER/bw. If you have generated stranded BigWig, they are in results/EXAMPLE/mapping_ALIGNER/bw_str.
If not already done, you can specifically get the BigWig files on your computer running:
You@YourComputer:~$ scp -pr username@core.cluster.france-bioinformatique.fr:/shared/projects/YourProjectName/RASflow_EDC/results/EXAMPLE/mapping_ALIGNER/bw_str PathTo/WhereYouWantToSave/
Snapshot of BigWig tracks visualized on IGV.
Mapping QC
Qualimap is used to check the mapping quality. You’ll find qualimap reports in results/EXAMPLE/mapping_ALIGNER/alignmentQC. Those reports contain a lot of information:
- information about the mapper
- number and % of mapped reads/pairs
- number of indels and mismatches
- coverage per chromosome
- insert size histogram
- …
Once again MultiQC aggregates the results of all the samples and you can have a quick overview by looking at results/EXAMPLE/mapping_ALIGNER/report_align_count_COUNTER.html or in the final report (ie 20210727T1030_report.html).
Counting
Counting results are saved in results/EXAMPLE/mapping_ALIGNER/counting_COUNTER (and in results/EXAMPLE/mapping_ALIGNER/repeats_COUNTER if you have enabled repeat analysis)
[username@clust-slurm-client RASflow_EDC]$ tree results/EXAMPLE/mapping_hisat2/counting_featureCounts/
results/EXAMPLE/mapping_hisat2/counting_featureCounts/
├── countTables
│   ├── D197-D192T27_count.tsv
│   ├── D197-D192T27_table.tsv
│   ├── D197-D192T27_table.tsv.summary
│   ├── D197-D192T28_count.tsv
│   ├── D197-D192T28_table.tsv
│   ├── D197-D192T28_table.tsv.summary
|   |...
├── heatmap.pdf
└── PCA.pdf
The count tables can be found in countTables folder. The count.tsv files are the tables with raw, not normalized counts.
|GeneID | counts | |——-|——–| |——-|——–|
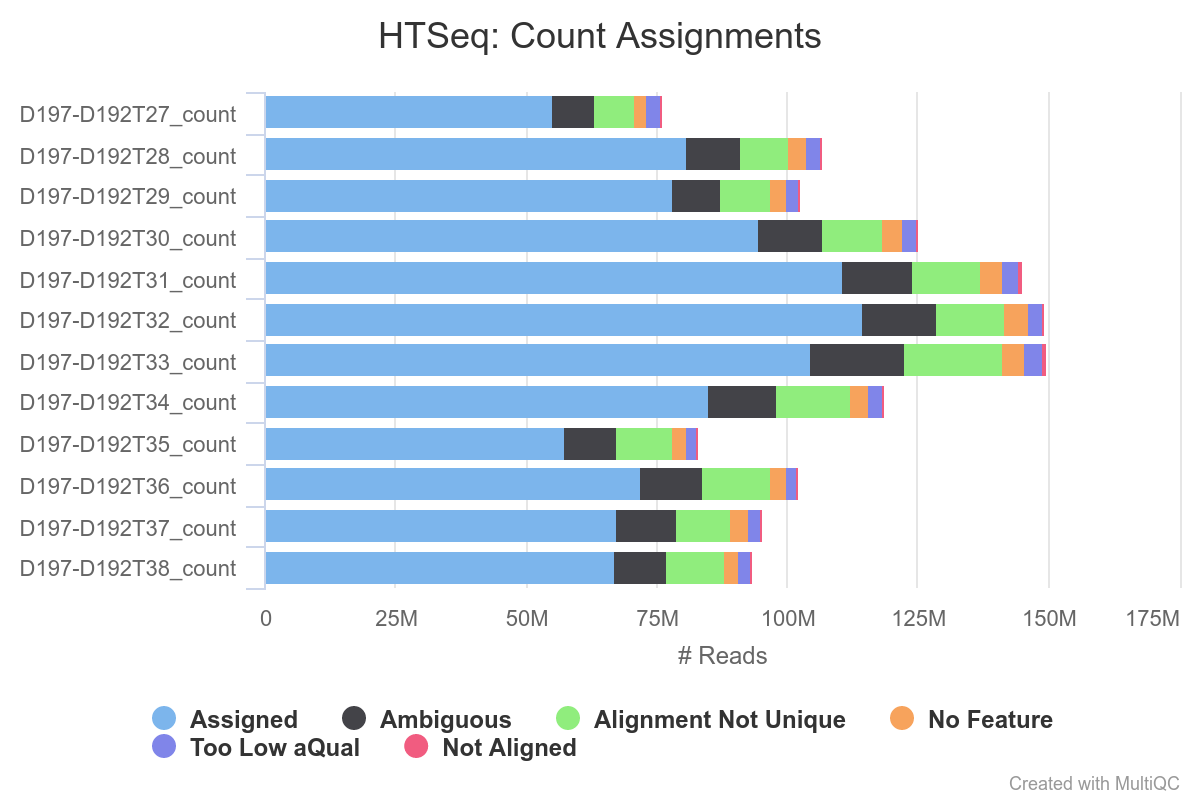
The .summary contains information about the reads that couldn’t be attributed to a feature:
[username@clust-slurm-client RASflow_EDC]$ cat results/EXAMPLE/mapping_hisat2/featureCounts/countTables/D197-D192T27_table.tsv.summary
Status	/shared/projects/bi4edc/RASflow_EDC/data/TIMING/hisat2/Sorted_bam/D197-D192T27.sort.bam
Assigned	51236995
Unassigned_Unmapped	265300
Unassigned_Read_Type	0
Unassigned_Singleton	0
Unassigned_MappingQuality	0
Unassigned_Chimera	0
Unassigned_FragmentLength	0
Unassigned_Duplicate	0
Unassigned_MultiMapping	21778669
Unassigned_Secondary	0
Unassigned_NonSplit	0
Unassigned_NoFeatures	1791248
Unassigned_Overlapping_Length	0
Unassigned_Ambiguity	16081650
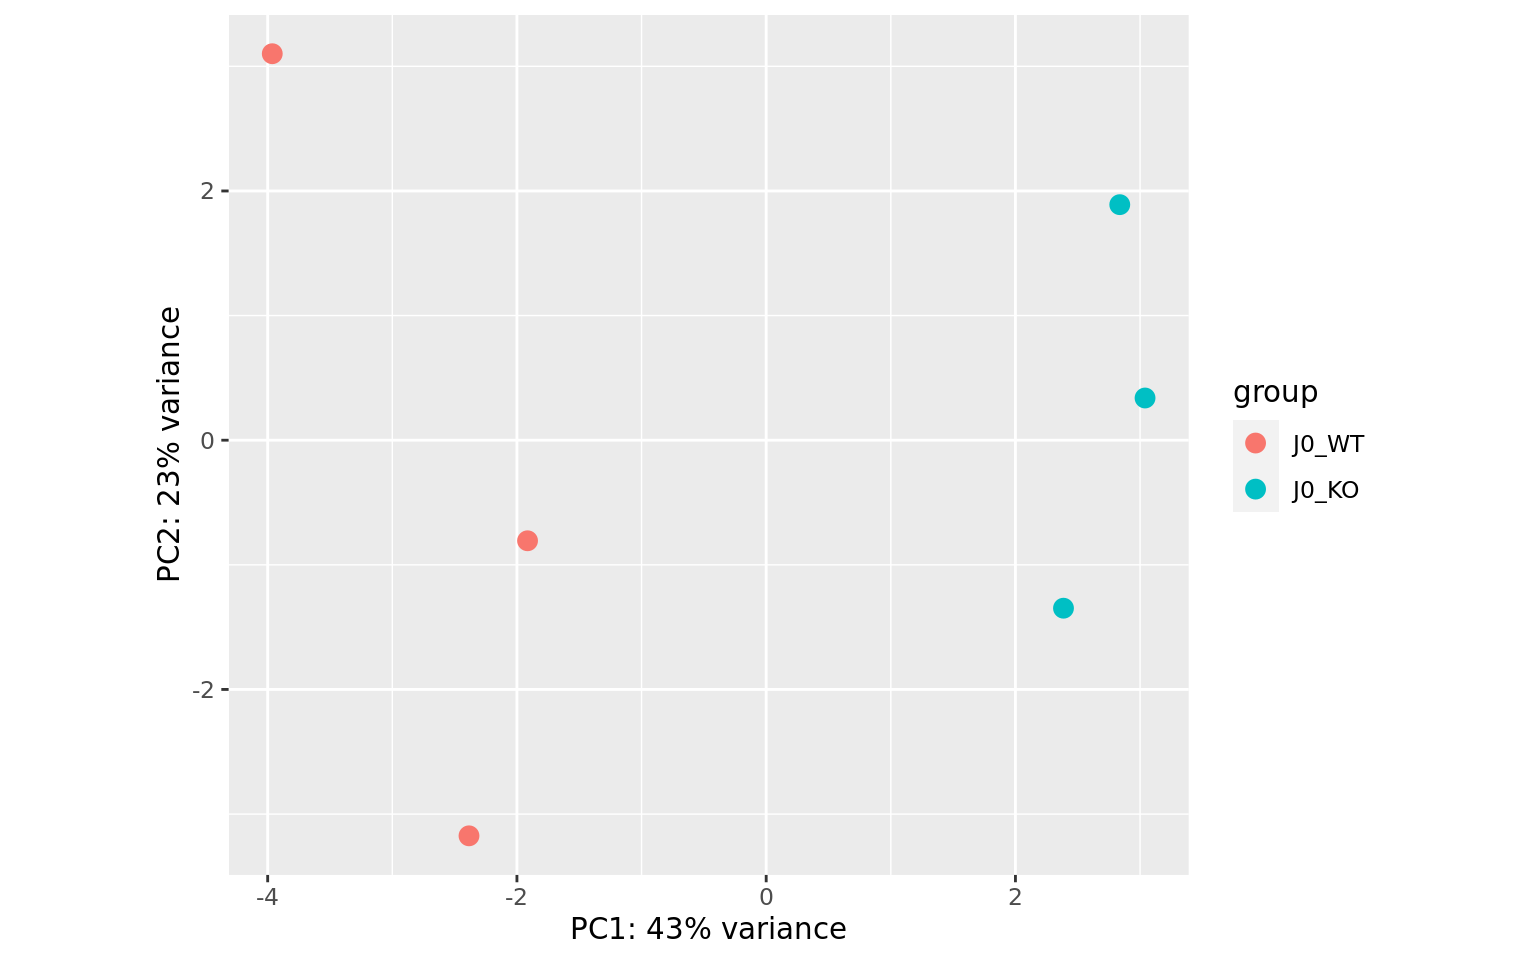
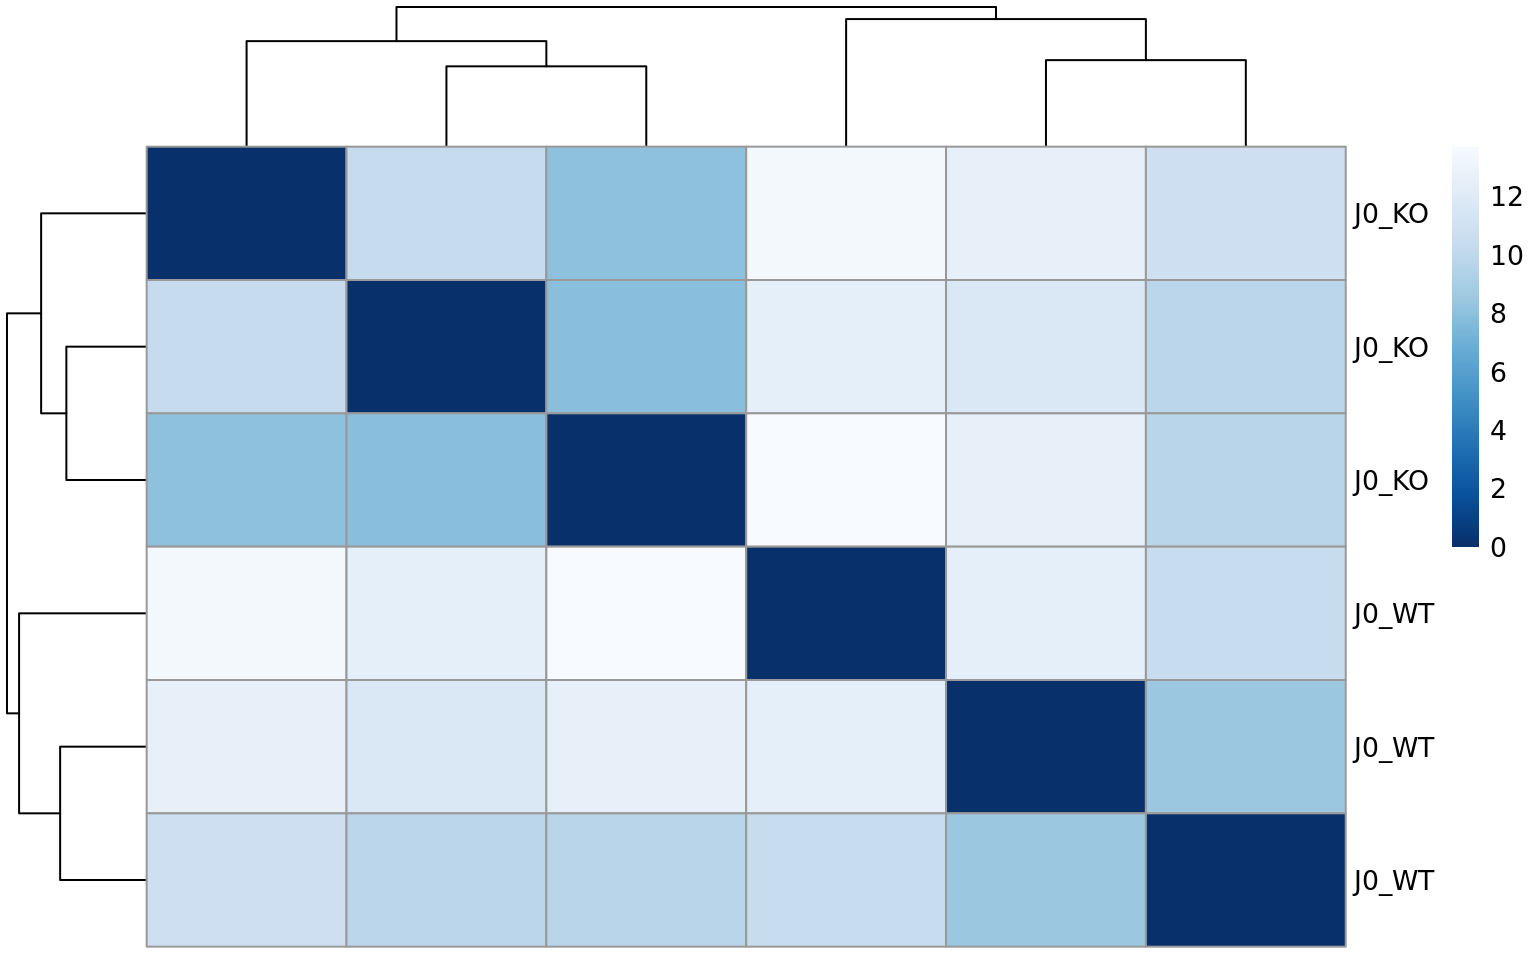
In addition, an interactive MDS plot as well as 2 PDF are generated:
Glimma/MDS_Plot.html
-
PCA.pdf: it contains two figures- PCA of all the samples, colored by group

- distribution of raw counts / samples
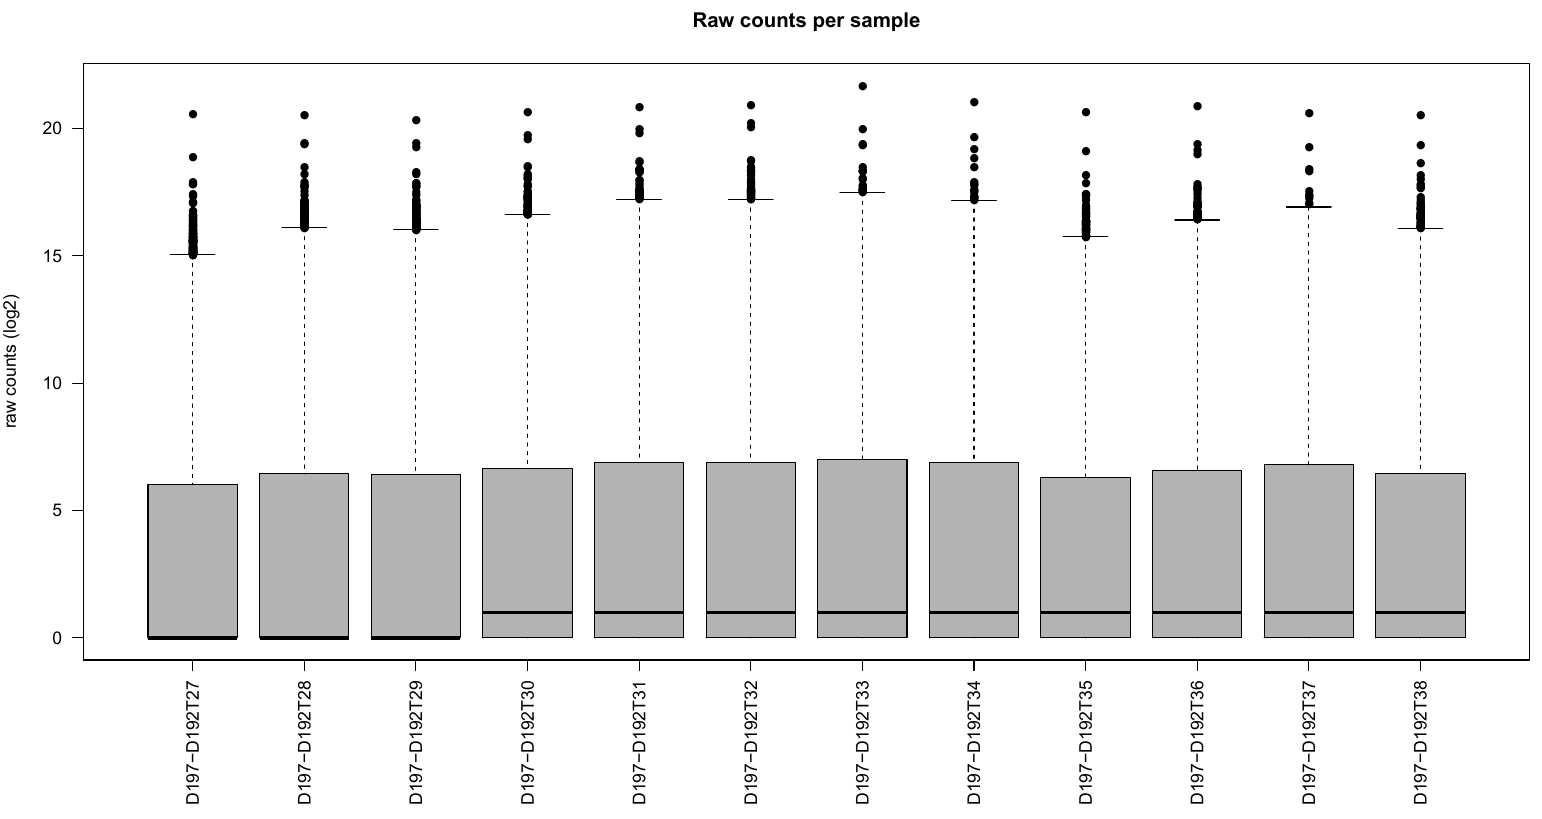
Heatmap.pdfwith a heatmap of sample distances
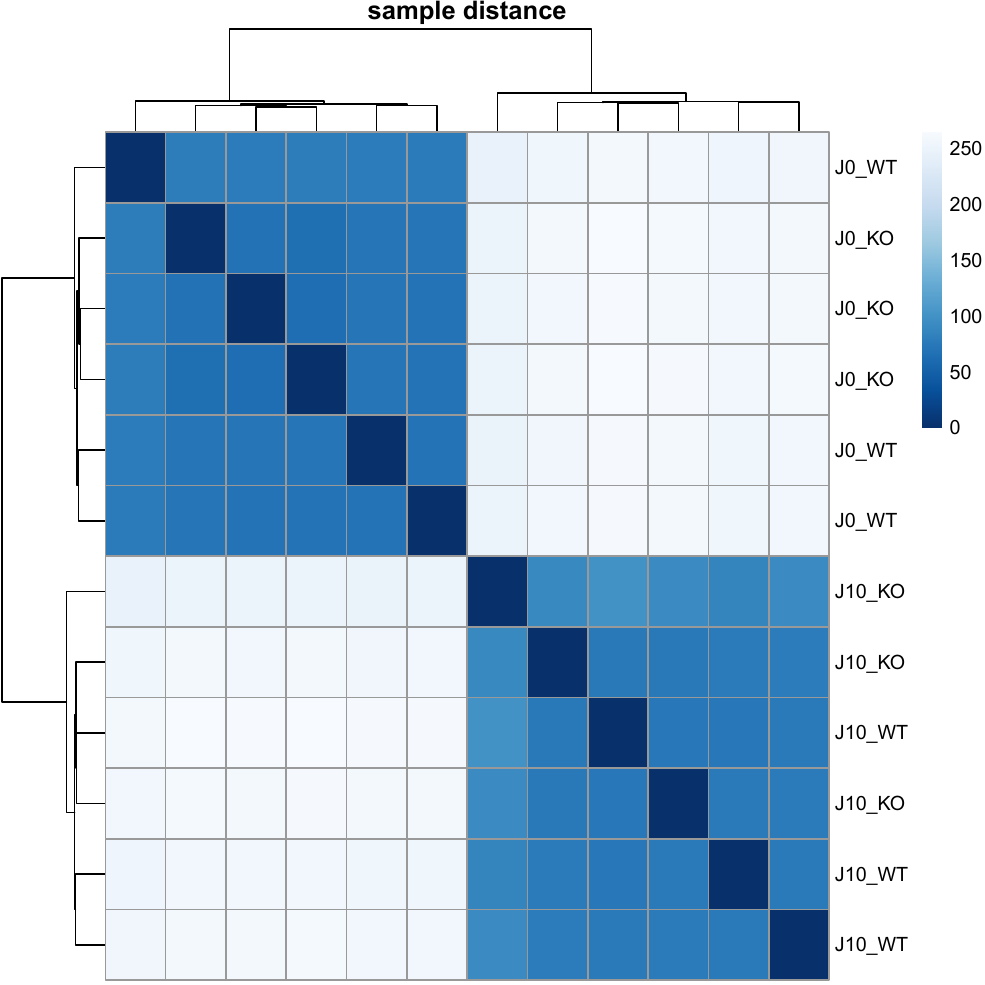
MultiQC is run after the counting, looking at report_align_count_COUNTER.html in results/EXAMPLE/mapping_ALIGNER/ (also included in the final report) will help you to check that everything went fine.
DEA results
DEA results are in results/EXAMPLE/mapping_ALIGNER/counting_COUNTER/DEA_DEATOOL.
[username@clust-slurm-client RASflow_EDC]$ tree -L 2 results/EXAMPLE/mapping_hisat2/counting_featureCounts/DEA_DESeq2/
results/EXAMPLE/mapping_hisat2/counting_featureCounts/DEA_DESeq2/
├── Report
│   ├── Glimma
│   ├── plots
│   └── regionReport
└── Tables
    ├── dea_J0_KO_J10_KO.tsv
    ├── dea_J0_WT_J0_KO.tsv
    ├── dea_J0_WT_J10_WT.tsv
    ├── dea_J10_WT_J10_KO.tsv
    ├── deg_J0_KO_J10_KO.tsv
    ├── deg_J0_WT_J0_KO.tsv
    ├── deg_J0_WT_J10_WT.tsv
    ├── deg_J10_WT_J10_KO.tsv
    ├── J0_KO_J10_KO_NormCounts.tsv
    ├── J0_WT_J0_KO_NormCounts.tsv
    ├── J0_WT_J10_WT_NormCounts.tsv
    └── J10_WT_J10_KO_NormCounts.tsv
- In
Tablesfolder are normalized count tables (..._NormCounts.tsv), as well as DEA results for each pair of conditions:- dea_J0_WT_J0_KO.tsv contains differential expression for all genes
- deg_J0_WT_J0_KO.tsv contains only the genes differentially expressed (FDR < 0.05)
- In
Report, you’ll find visual outputs.
[username@clust-slurm-client RASflow_EDC]$ tree -L 2 results/EXAMPLE/mapping_hisat2/counting_featureCounts/DEA_DESeq2/Report/
results/EXAMPLE/mapping_hisat2/counting_featureCounts/DEA_DESeq2/Report/
├── Glimma
│   ├── css
│   ├── js
│   ├── MDPlot_J0_KO_J10_KO.html
│   ├── MDPlot_J0_WT_J0_KO.html
│   ├── MDPlot_J0_WT_J10_WT.html
│   ├── MDPlot_J10_WT_J10_KO.html
│   ├── MDSPlot_J0_KO_J10_KO.html
│   ├── MDSPlot_J0_WT_J0_KO.html
│   ├── MDSPlot_J0_WT_J10_WT.html
│   ├── MDSPlot_J10_WT_J10_KO.html
│   ├── Volcano_J0_KO_J10_KO.html
│   ├── Volcano_J0_WT_J0_KO.html
│   ├── Volcano_J0_WT_J10_WT.html
│   └── Volcano_J10_WT_J10_KO.html
├── plots
│   ├── heatmapTop_J0_KO_J10_KO.pdf
│   ├── heatmapTop_J0_WT_J0_KO.pdf
│   ├── heatmapTop_J0_WT_J10_WT.pdf
│   ├── heatmapTop_J10_WT_J10_KO.pdf
│   ├── PCA_J0_KO_J10_KO.pdf
│   ├── PCA_J0_WT_J0_KO.pdf
│   ├── PCA_J0_WT_J10_WT.pdf
│   ├── PCA_J10_WT_J10_KO.pdf
│   ├── SampleDistances_J0_KO_J10_KO.pdf
│   ├── SampleDistances_J0_WT_J0_KO.pdf
│   ├── SampleDistances_J0_WT_J10_WT.pdf
│   ├── SampleDistances_J10_WT_J10_KO.pdf
│   ├── volcano_plot_J0_KO_J10_KO.pdf
│   ├── volcano_plot_J0_WT_J0_KO.pdf
│   ├── volcano_plot_J0_WT_J10_WT.pdf
│   └── volcano_plot_J10_WT_J10_KO.pdf
└── regionReport
    ├── J0_KO_J10_KO
    ├── J0_WT_J0_KO
    ├── J0_WT_J10_WT
    └── J10_WT_J10_KO
In regionReport you’ll find a report generated by regionReport using DESeq2Report() or edgeReport() for each pair of conditions.
It contains interesting plots, such as
- PCA
- Sample-to-sample distance heatmap
- MA plots
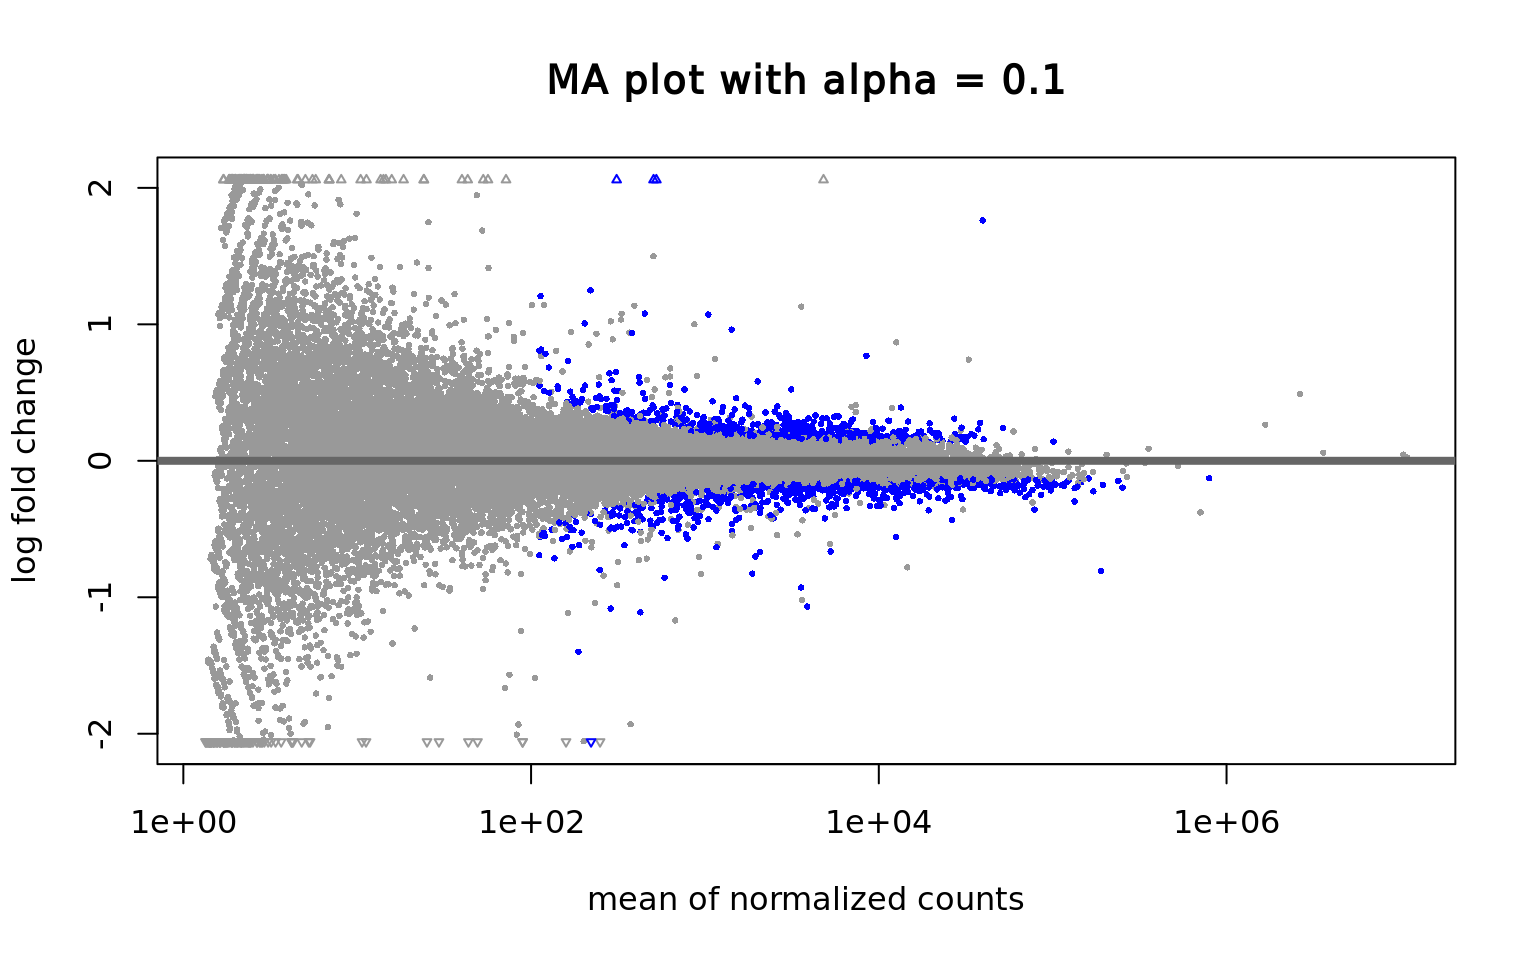
- P-values distribution

- Count plots for top features
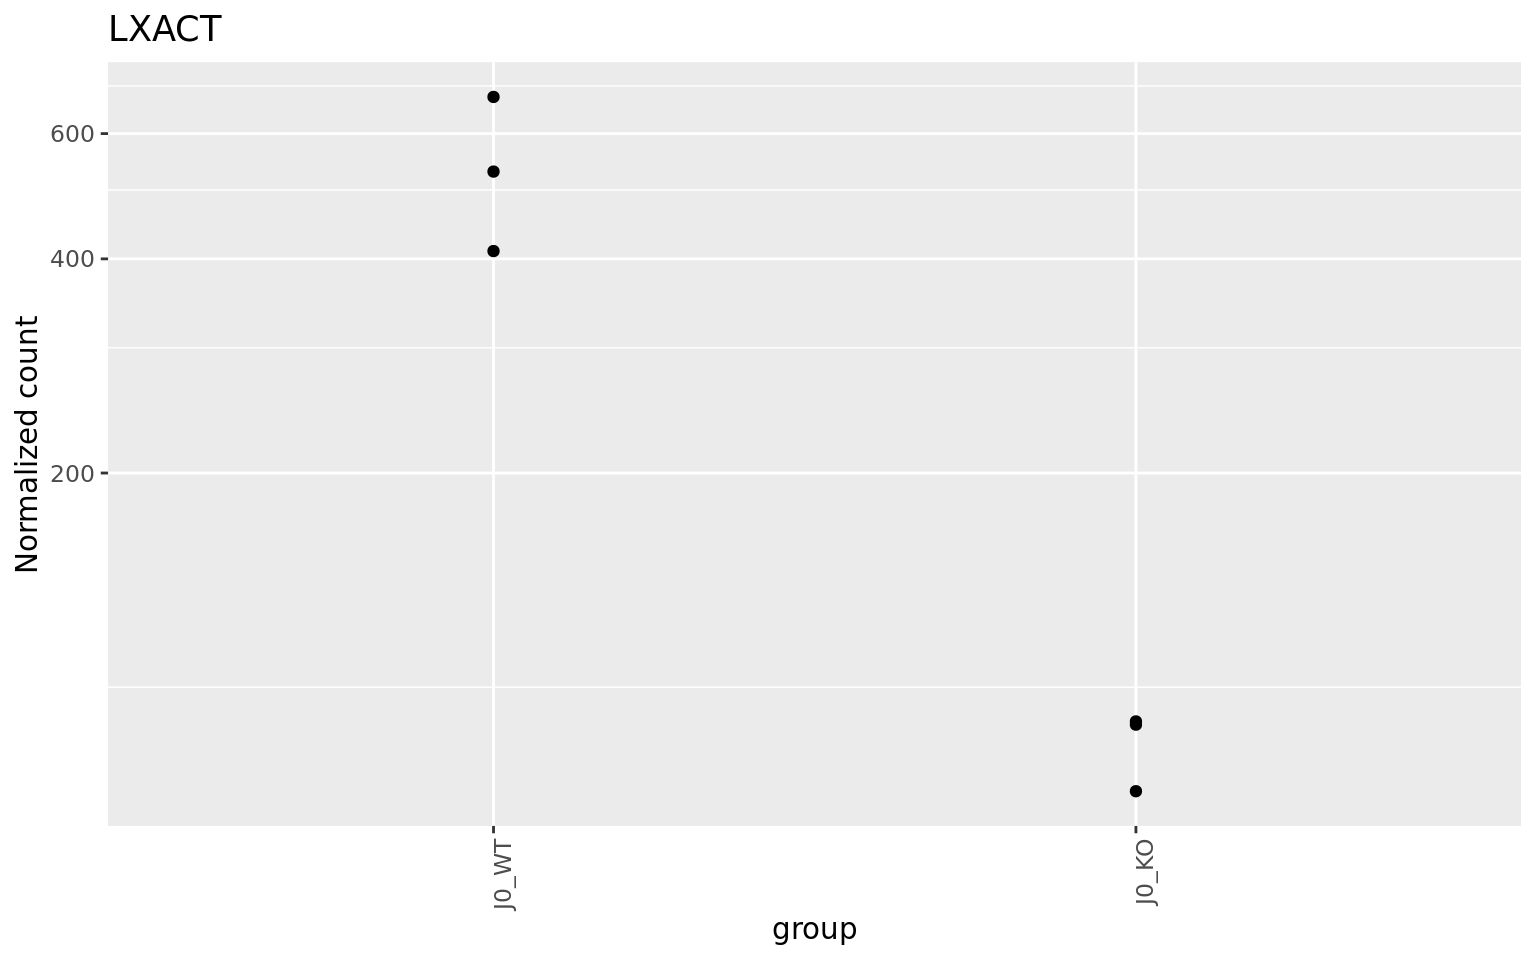
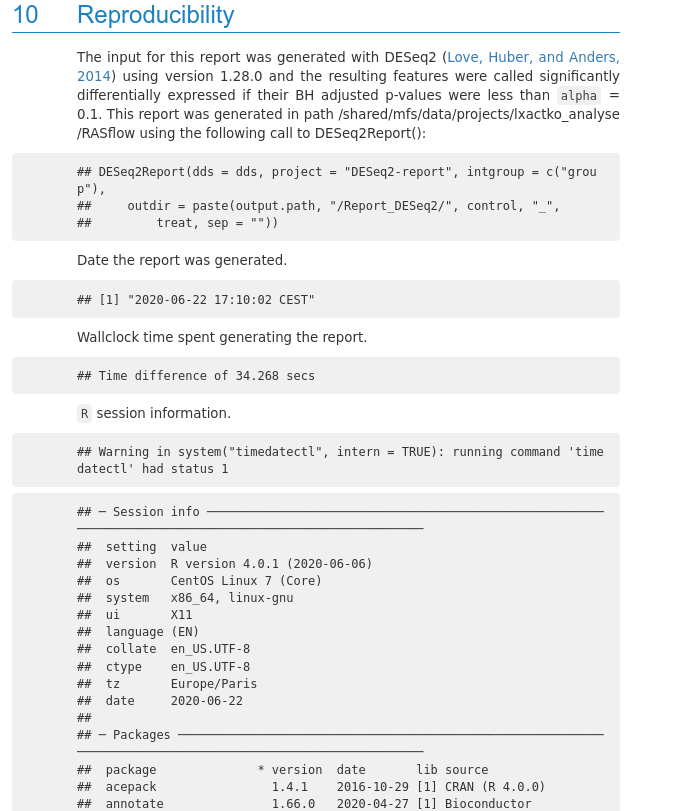
as well as a table with top features
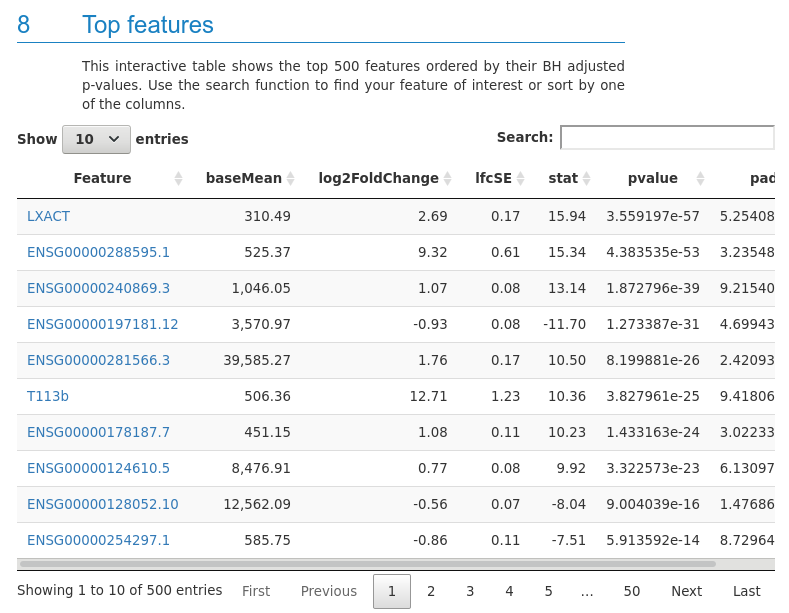
and information about all the tools used to facilitate reproducibility.
Additional figures can be found in plots folder. You’ll find for each pair of conditions:
- Volcano plots representing differential expression
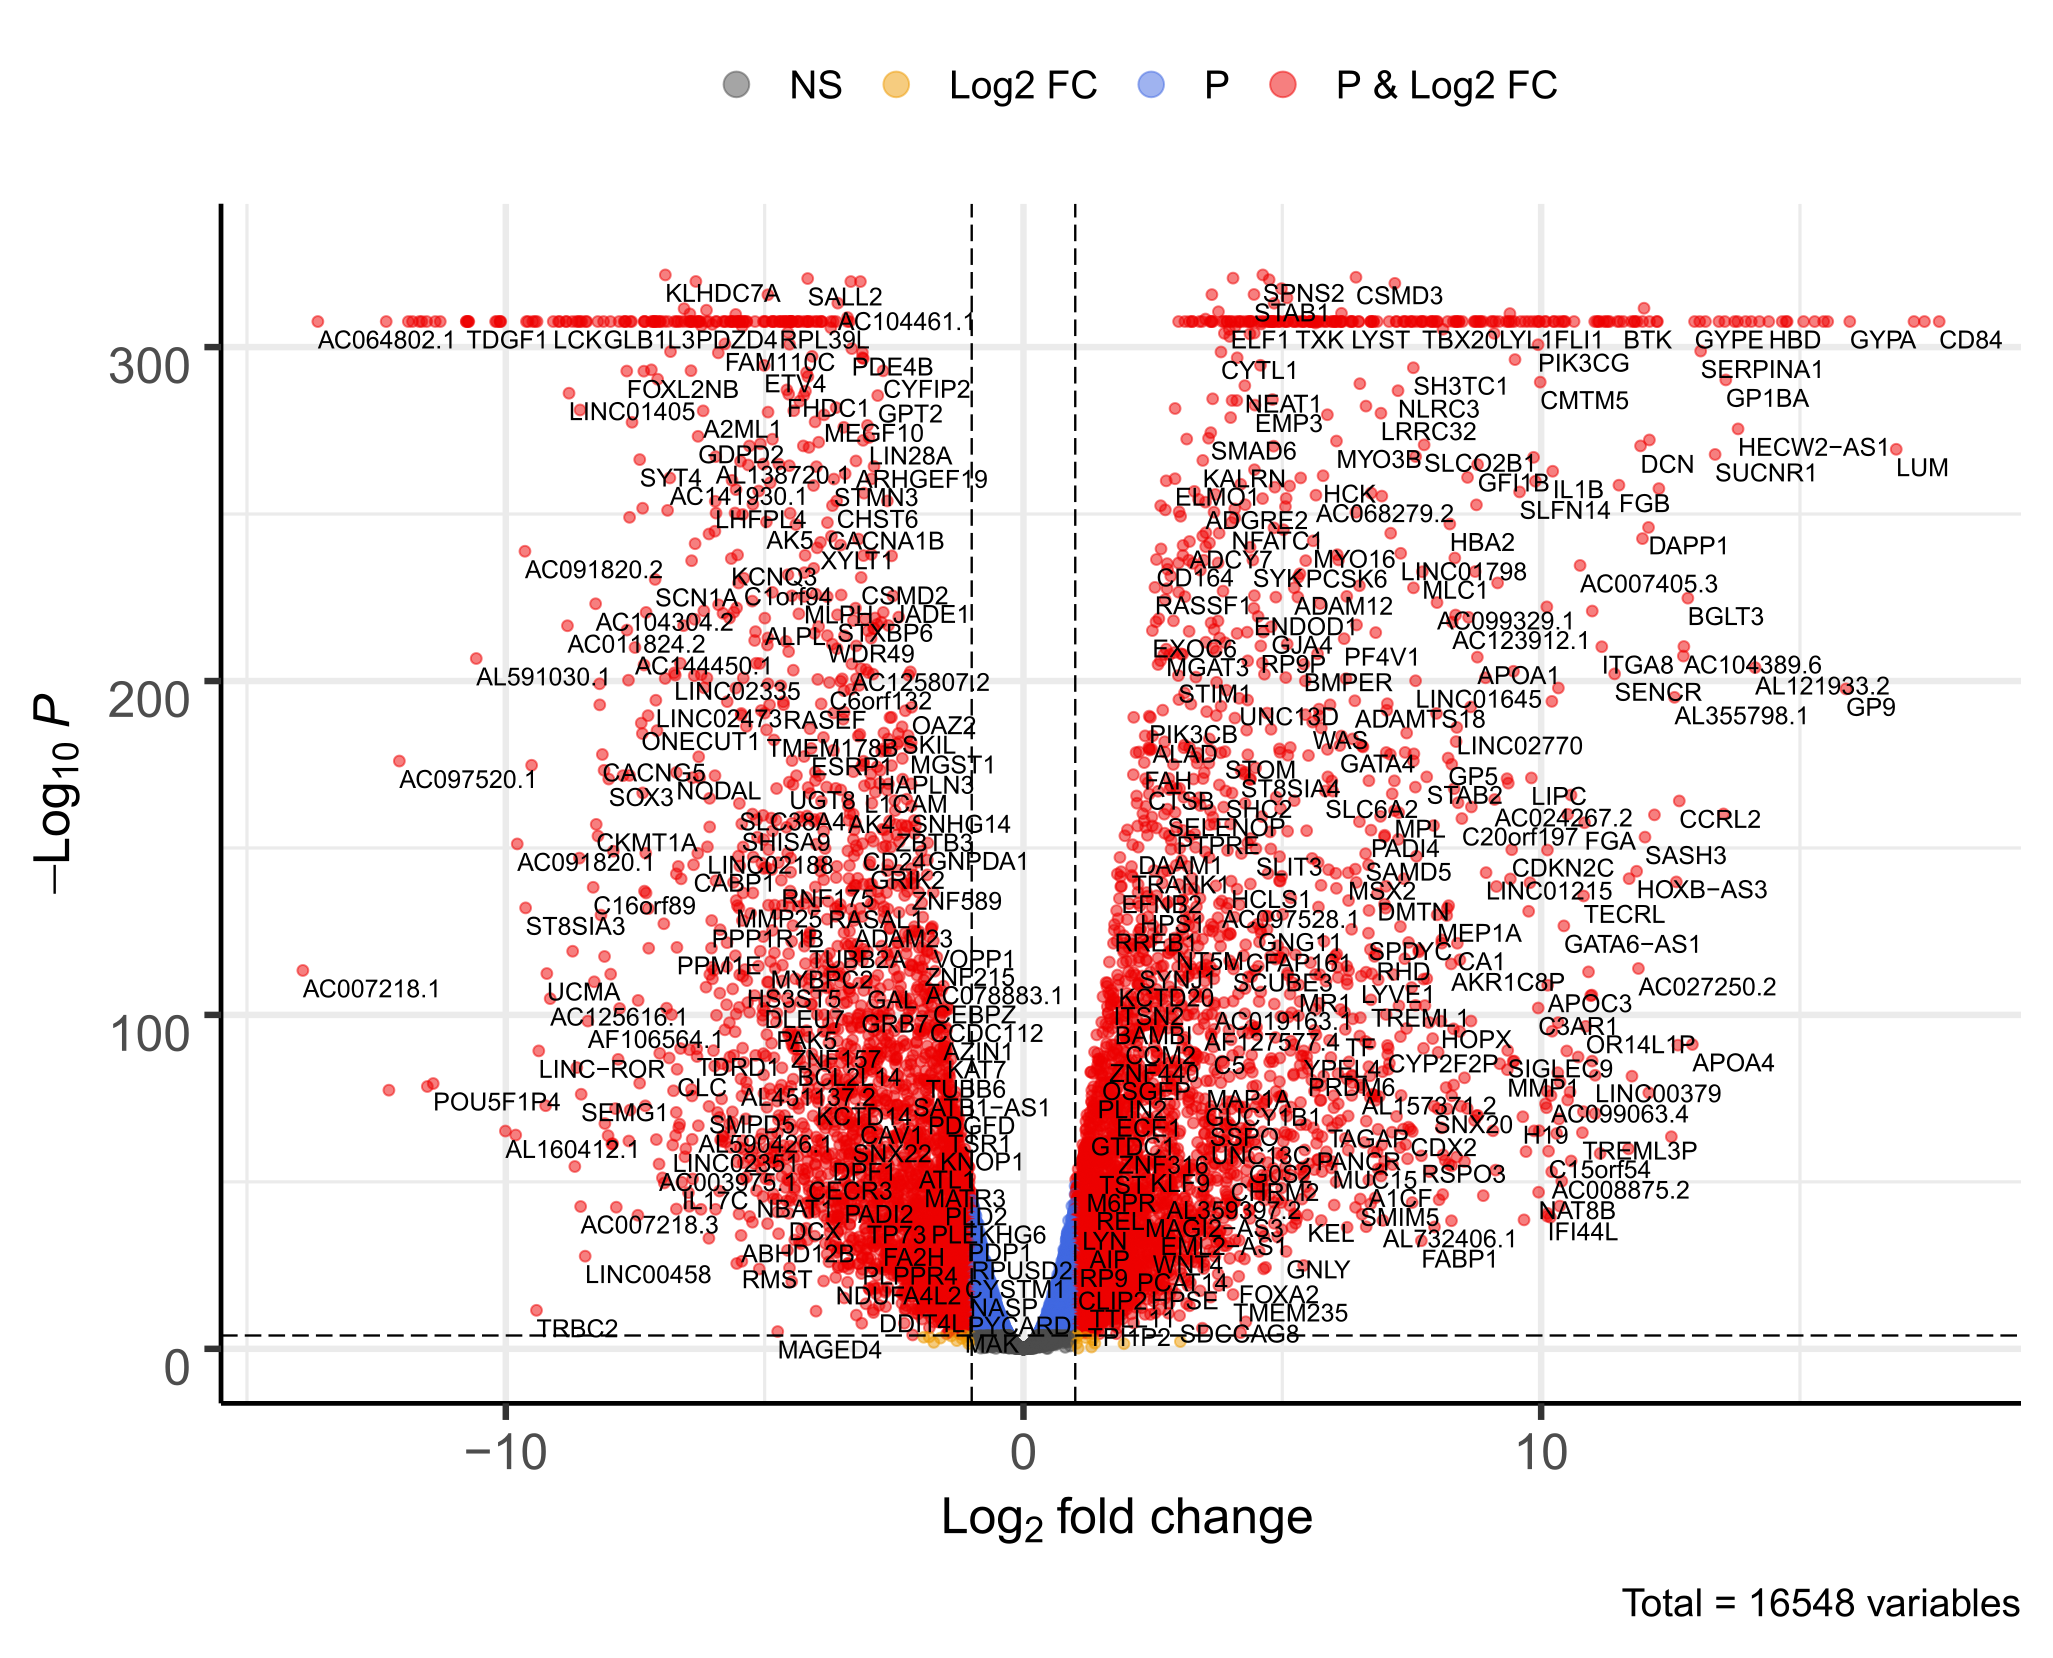
- A heatmap of the 20 most regulated genes

- PCA plots (as in the final report)
- Sample-to-sample distance heatmaps (as in the report)
Finally in Glimma folder, you’ll find interactive plots made with Glimma that will help you to explore the results:
- The MDS plot is an improved PCA representation
- MD plots represent all the genes with the fold change as a function of the average expression. You can click on the points and see the corresponding normalised expression on the right.
And search in the bar for your favorite gene.
- Volcano plots, with the same functionalities as the MD plots.
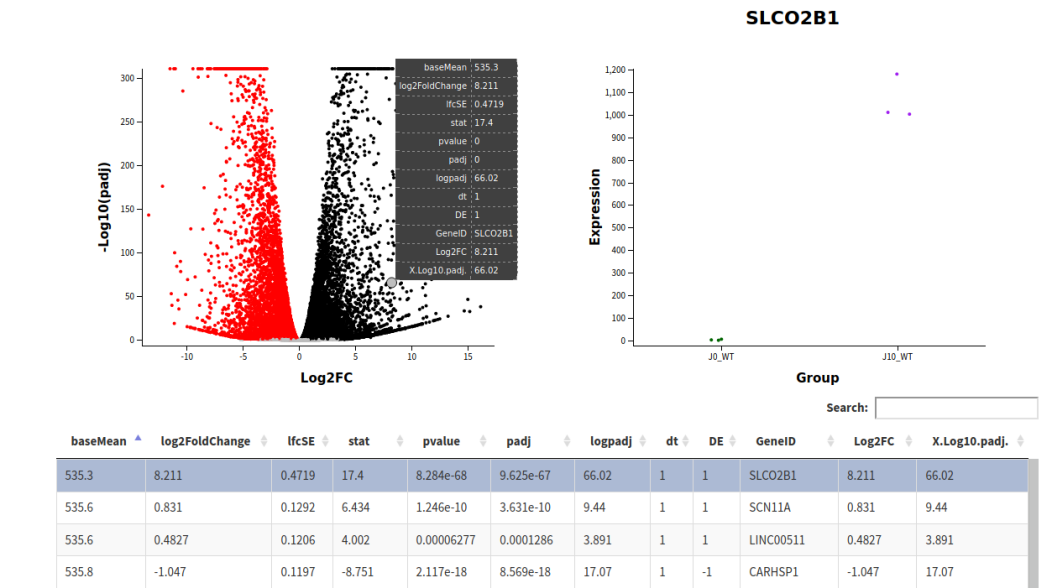
All those plots are included in the final report.
![]()
Resources
- iPOP-UP
- IFB
- Create and manage your account
- Community support
- Documentation
- Jupyter Hub
- BiBs practical guide
- RASflow, Zhang, X.
- Original article: RASflow: an RNA-Seq analysis workflow with Snakemake, Xiaokang Zhang & Inge Jonassen, BMC Bioinformatics 21, 110 (2020)
- RASflow original git repository
- Tools implemented
- FastQC
- MultiQC
- Trim Galore
- HISAT2
- STAR
- Salmon
- Samtools
- deepTools
- Qualimap
- featureCounts (SubReads)
- HTseq-count
- edgeR
- DESeq2
- Glimma
- TEcount from TEtranscripts
![]()
Extra help!
How to follow your jobs
Running jobs
You can check the jobs that are running using squeue.
[username@clust-slurm-client RASflow_EDC]$ squeue -u username
Information about past jobs
The sacct command gives you information about past and running jobs. The documentation is here. You can get different information with the --format option. For instance:
[username@clust-slurm-client RASflow_EDC]$ sacct --format=JobID,JobName,Start,CPUTime,MaxRSS,ReqMeM,State
       JobID    JobName               Start    CPUTime     MaxRSS     ReqMem      State
------------ ---------- ------------------- ---------- ---------- ---------- ----------
...
9875767          BigWig 2020-07-27T16:02:48   00:00:59               80000Mn  COMPLETED
9875767.bat+      batch 2020-07-27T16:02:48   00:00:59     87344K    80000Mn  COMPLETED
9875768         BigWigR 2020-07-27T16:02:51   00:00:44               80000Mn  COMPLETED
9875768.bat+      batch 2020-07-27T16:02:51   00:00:44     85604K    80000Mn  COMPLETED
9875769             PCA 2020-07-27T16:02:52   00:01:22                2000Mn  COMPLETED
9875769.bat+      batch 2020-07-27T16:02:52   00:01:22    600332K     2000Mn  COMPLETED
9875770         multiQC 2020-07-27T16:02:52   00:01:16                2000Mn  COMPLETED
9875770.bat+      batch 2020-07-27T16:02:52   00:01:16    117344K     2000Mn  COMPLETED
9875773        snakejob 2020-07-27T16:04:35   00:00:42                2000Mn  COMPLETED
9875773.bat+      batch 2020-07-27T16:04:35   00:00:42     59360K     2000Mn  COMPLETED
9875774             DEA 2020-07-27T16:05:25   00:05:49                2000Mn    RUNNING
Here you have the job ID and name, its starting time, its running time, the maximum RAM used, the memory you requested (it has to be higher than MaxRSS, otherwise the job fails, but not much higher to allow the others to use the resource), and job status (failed, completed, running).
Add -S MMDD to have older jobs (default is today only).
[username@clust-slurm-client RASflow_EDC]$ sacct --format=JobID,JobName,Start,CPUTime,MaxRSS,ReqMeM,State -S 0518
Cancelling a job
If you want to cancel a job: scancel job number
[username@clust-slurm-client RASflow_EDC]$ scancel 8016984
Nota: when snakemake is working on a folder, this folder is locked so that you can’t start another DAG and create a big mess. If you cancel the main job, snakemake won’t be able to unlock the folder (see below).
Having errors?
To quickly check if everything went fine, you have to check the main log. If everything went fine you’ll have :
[username@clust-slurm-client RASflow_EDC]$ cat slurm_output/RASflow-13350656.out
########################################
Date: 2020-09-25T10:57:14+0200
User: mhennion
Host: cpu-node-60
Job Name: RASflow
Job Id: 13350656
Directory: /shared/projects/bi4edc/RASflow_EDC
########################################
RASflow_EDC version: v0.4
[...]
RASflow is done!
########################################
---- Errors ----
There were no errors ! It's time to look at your results, enjoy!
########################################
Job finished 2020-09-25T11:06:50+0200
---- Total runtime 576 s ; 9 min ----
If not, you’ll see a summary of the errors:
[username@clust-slurm-client RASflow_EDC]$ cat slurm_output/RASflow-13605306.out
########################################
Date: 2020-11-04T09:21:28+0100
User: mhennion
Host: cpu-node-28
Job Name: RASflow
Job Id: 13605306
Directory: /shared/projects/bi4edc/RASflow_EDC
########################################
RASflow_EDC version: v0.4
[...]
RASflow is done!
########################################
---- Errors ----
logs/20201104T0921_dea_genome.txt	-        Rscript scripts/dea_genome.R /shared/projects/repeats/RASflow_EDC/results/H9/mapping_hisat2/counting_featureCounts/countTables/ /shared/projects/repeats/RASflow_EDC/results/H9/mapping_hisat2/counting_featureCounts/DEA_DESeq2/
logs/20201104T0921_dea_genome.txt	-        (one of the commands exited with non-zero exit code; note that snakemake uses bash strict mode!)
logs/20201104T0921_dea_genome.txt	-
logs/20201104T0921_dea_genome.txt	-Error executing rule DEA on cluster (jobid: 1, external: 13605307, jobscript: /shared/mfs/data/projects/bi4edc/RASflow_EDC/.snakemake/tmp.ig057qsd/snakejob.DEA.1.sh). For error details see the cluster log and the log files of the involved rule(s).
logs/20201104T0921_dea_genome.txt	-Job failed, going on with independent jobs.
logs/20201104T0921_dea_genome.txt	:Exiting because a job execution failed. Look above for error message
logs/20201104T0921_dea_genome.txt	-Complete log: /shared/mfs/data/projects/bi4edc/RASflow_EDC/.snakemake/log/2020-11-04T092135.247706.snakemake.log

########################################
Job finished 2020-11-04T09:25:23+0100
---- Total runtime 235 s ; 3 min ----
And you can check the problem looking as the specific log file, here logs/20201104T0921_dea_genome.txt
[Wed Nov  4 09:21:40 2020]
rule DEA:
    input: ...
    output: ...
    jobid: 1

Submitted job 1 with external jobid 13605307.
[Wed Nov  4 09:25:10 2020]
Error in rule DEA:
    jobid: 1
    output: ...
    conda-env: /shared/mfs/data/projects/bi4edc/RASflow_EDC/.snakemake/conda/43b54aba
    shell:
        Rscript scripts/dea_genome.R /shared/...
        (one of the commands exited with non-zero exit code; note that snakemake uses bash strict mode!)

Error executing rule DEA on cluster (jobid: 1, external: 13605307, jobscript: /shared/mfs/data/projects/bi4edc/RASflow_EDC/.snakemake/tmp.ig057qsd/snakejob.DEA.1.sh). For error details see the cluster log and the log files of the involved rule(s).
Job failed, going on with independent jobs.
Exiting because a job execution failed. Look above for error message
Complete log: /shared/mfs/data/projects/bi4edc/RASflow_EDC/.snakemake/log/2020-11-04T092135.247706.snakemake.log
You can have the description of the error in the SLURM output corresponding to the external jobid, here 13605307:
[username @ clust-slurm-client RASflow_EDC]$ cat slurm_output/slurm-13605307.out
Common errors
Error starting gedit on IFB
If you encounter an error starting gedit
[unsername @ clust-slurm-client 16:04]$ ~ : gedit toto.txt
(gedit:6625): Gtk-WARNING **: cannot open display:
Be sure to include -X when connecting to the cluster (-X option is necessary to run graphical applications remotely).
Use :
You@YourComputer:~$ ssh -X unsername@core.cluster.france-bioinformatique.fr
or
You@YourComputer:~$ ssh -X -o "ServerAliveInterval 10" unsername@core.cluster.france-bioinformatique.fr
The option -o "ServerAliveInterval 10" is facultative, it keeps the connection alive even if you’re not using your shell for a while.
Initial QC fails
If you don’t get MultiQC report_quality_control.html report in results/EXAMPLE/fastqc, you may have some fastq files not fitting the required format:
- SampleName_R1.fastq.gz and SampleName_R2.fastq.gz for pair-end data,
- SampleName.fastq.gz for single-end data.
Please see how to correct a batch of FASTQ files.
Memory
I set up the memory necessary for each rule, but it is possible that big datasets induce a memory excess error. In that case the job stops and you get in the corresponding Slurm output something like this:
slurmstepd: error: Job 8430179 exceeded memory limit (10442128 > 10240000), being killed
slurmstepd: error: Exceeded job memory limit
slurmstepd: error: *** JOB 8430179 ON cpu-node-13 CANCELLED AT 2020-05-20T09:58:05 ***
Will exit after finishing currently running jobs.
In that case, you can increase the memory request by modifying in workflow/xxx.rules the mem_mb entry corresponding to the rule that failed.
rule summaryReport:
    input:
        trimFiles
    output:
        report = final_path + "/fastqc_after_trimming/report_quality_control_after_trimming.html"
    singularity:
        "rasflow_edc.simg"
    resources:
           mem_mb=1000
    params:
        path = final_path + "/fastqc_after_trimming"
    shell:
        """
        cp {intermediate_path}/*fastqc* {params.path}
        cp {intermediate_path}/*report.txt {params.path}
        multiqc {params.path} --filename {output.report}
        """
...
Then restart your workflow.
Folder locked
When snakemake is working on a folder, this folder is locked so that you can’t start another DAG and create a big mess. If you cancel the main job, snakemake won’t be able to unlock the folder and next time you run Workflow.sh, you will get the following error:
Error: Directory cannot be locked. Please make sure that no other Snakemake process is trying to create the same files in the following directory:
/shared/mfs/data/projects/lxactko_analyse/RASflow
If you are sure that no other instances of snakemake are running on this directory, the remaining lock was likely caused by a kill signal or a power loss. It can be removed with the --unlock argument.
In order to remove the lock, run:
[username@clust-slurm-client RASflow_EDC]$ sbatch Unlock.sh
Then you can restart your workflow.
Storage space
Sometimes you may reach the quota you have for your project. To check the quota, run:
[username@clust-slurm-client RASflow_EDC]$ lfsgetquota YourProjectName
In principle it should raise an error, but sometimes it doesn’t and it’s hard to find out what is the problem. So if a task fails with no error (typically mapping or counting), try to make more space (or ask for more space on IFB Community support or iPOP-UP Community support) before trying again.
It is also important to check if the limit in the number of files is not reached (it happens frequenctly if you use conda, check in your ~/.conda folder).
DRMAA error
If you use an old version of RASflow_EDC, you might have the following error:
DRMAA Error: code 2: slurm_load_jobs error: Socket timed out on send/recv operation,job_id:xxxx
This is because slurm-drmaa package is not maintained by the SLURM vendor and less well supported. We decided to use a different way to allow Snakemake to talk to SLURM. Please use RASflow_EDC version v1.3 or later.
Good practice
- Always save job ID or the dateTtime (ie 20200615T1540) in your notes when launching
Workflow.sh. It’s easier to find the outputs you’re interested in days/weeks/months/years later.
Juggling with several projects
If you work on several projects [as defined by cluster documentation], you can either
- have one independant installation of RASflow_EDC / project with its own Singularity Image (2 Go). To do that, git clone RASflow_EDC repository in each project.
- have an independant RASflow_EDC folder, but share the Singularity Image. To do that, git clone RASflow_EDC repository in each project, but, before running any analysis, create a symbolic link of
rasflow_edc.simgfrom your first project:[username@clust-slurm-client PROJECT2]$ cd RASflow_EDC [username@clust-slurm-client RASflow_EDC]$ ln -s /shared/projects/YourFirstProjectName/RASflow_EDC/rasflow_edc.simg/ rasflow_edc.simg - Have only one RASflow_EDC folder and start all your analysis from the same project, but reading input files and writing result files in a different project.
Tricks
Make aliases
To save time avoiding typing long commands again and again, you can add aliases to your .bashrc file (change only the aliases, unless you know what you’re doing).
[username@clust-slurm-client ]$ cat ~/.bashrc
# .bashrc

# Source global definitions
if [ -f /etc/bashrc ]; then
	. /etc/bashrc
fi

# Uncomment the following line if you don't like systemctl's auto-paging feature:
# export SYSTEMD_PAGER=

# User specific aliases and functions

alias qq="squeue -u username"
alias sa="sacct --format=JobID,JobName,Start,CPUTime,MaxRSS,ReqMeM,State"
alias ll="ls -lht --color=always"
It will work next time you connect to the server. When you type sa, you will get the command sacct --format=JobID,JobName,Start,CPUTime,MaxRSS,ReqMeM,State running.
Quickly change fastq names
It is possible to quickly rename all your samples using mv. For instance if your samples are named with dots instead of underscores and without R:
[username@clust-slurm-client Raw_fastq]$ ls
D192T27.1.fastq.gz
D192T27.2.fastq.gz
D192T28.1.fastq.gz
D192T28.2.fastq.gz
D192T29.1.fastq.gz
D192T29.2.fastq.gz
D192T30.1.fastq.gz
D192T30.2.fastq.gz
D192T31.1.fastq.gz
D192T31.2.fastq.gz
D192T32.1.fastq.gz
D192T32.2.fastq.gz
You can modify them using mv and a loop on sample numbers.
[username@clust-slurm-client Raw_fastq]$ for i in `seq 27 32`; do mv D192T$i\.1.fastq.gz D192T$i\_R1.fastq.gz; done
[username@clust-slurm-client Raw_fastq]$ for i in `seq 27 32`; do mv D192T$i\.2.fastq.gz D192T$i\_R2.fastq.gz; done
Now sample names are OK:
[username@clust-slurm-client Raw_fastq]$ ls
D192T27_R1.fastq.gz
D192T27_R2.fastq.gz
D192T28_R1.fastq.gz
D192T28_R2.fastq.gz
D192T29_R1.fastq.gz
D192T29_R2.fastq.gz
D192T30_R1.fastq.gz
D192T30_R2.fastq.gz
D192T31_R1.fastq.gz
D192T31_R2.fastq.gz
D192T32_R1.fastq.gz
D192T32_R2.fastq.gz
![]()
|
BiBs
2026 parisepigenetics
https://github.com/parisepigenetics/bibs |
| programming pages theme v0.5.22 (https://github.com/pixeldroid/programming-pages) |